DATAPUMP using FSS for Autonomous Database
Migrating databases to Oracle Cloud Infrastructure (OCI) often involves transferring large volumes of data securely and efficiently. OCI’s File Storage Service (FSS) provides a scalable, durable, and high-performance file storage solution that can be integral in facilitating smooth database migrations. This blog post DATAPUMP using FSS for Autonomous Database to OCI will showcase all the steps on how to use FSS for efficient migration.
Similar approach can also be used to refresh the database from On-premise/Cloud databases to an Autonomous database. This process can also be achieved using Object Storage bucket however lesser than Oracle 21r version of Datapump(expdp) to object storage is currently not supported.
Similar approach can also be used to refresh the database from On-premise/Cloud databases to an Autonomous database. This process can also be achieved using Object Storage bucket however lesser than Oracle 21r version of Datapump(expdp) to object storage is currently not supported.
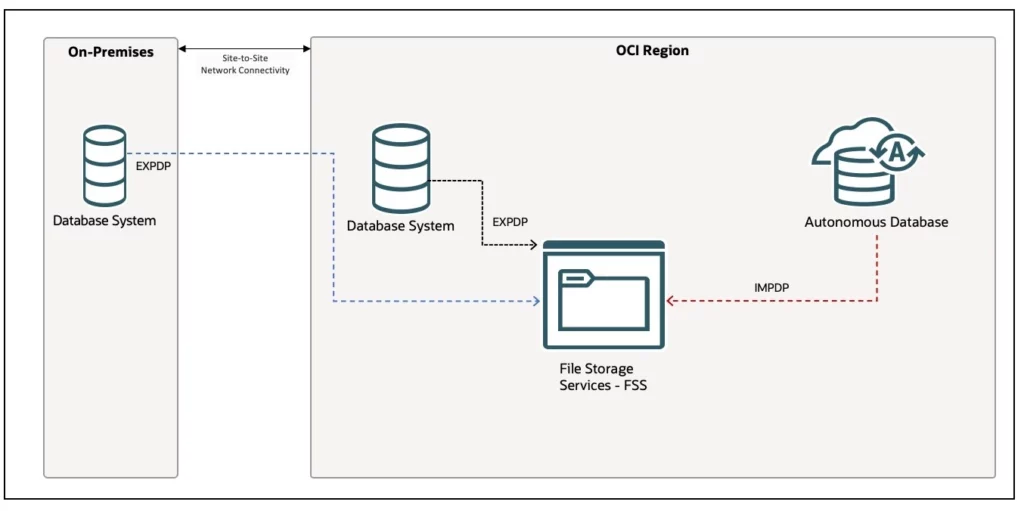
ARCHITECTURE
Understanding FSS in OCI
FSS in OCI offers complete managed file storage service that supports the Network File System (NFS) protocol. It is designed to provide high throughput and IOPS with low latencies, making it ideal for database migration tasks. FSS can be particularly useful for migrations that involve large databases or require an intermediary storage area before the data is imported into the target database.
FSS in OCI offers complete managed file storage service that supports the Network File System (NFS) protocol. It is designed to provide high throughput and IOPS with low latencies, making it ideal for database migration tasks. FSS can be particularly useful for migrations that involve large databases or require an intermediary storage area before the data is imported into the target database.
PRE-REQUISITES
Note : If ADB is provisioned with Secure Access, FSS cannot be used.
- Provision FSS in OCI
- Provision Autonomous Database in OCI with private endpoint access only
Note : If ADB is provisioned with Secure Access, FSS cannot be used.
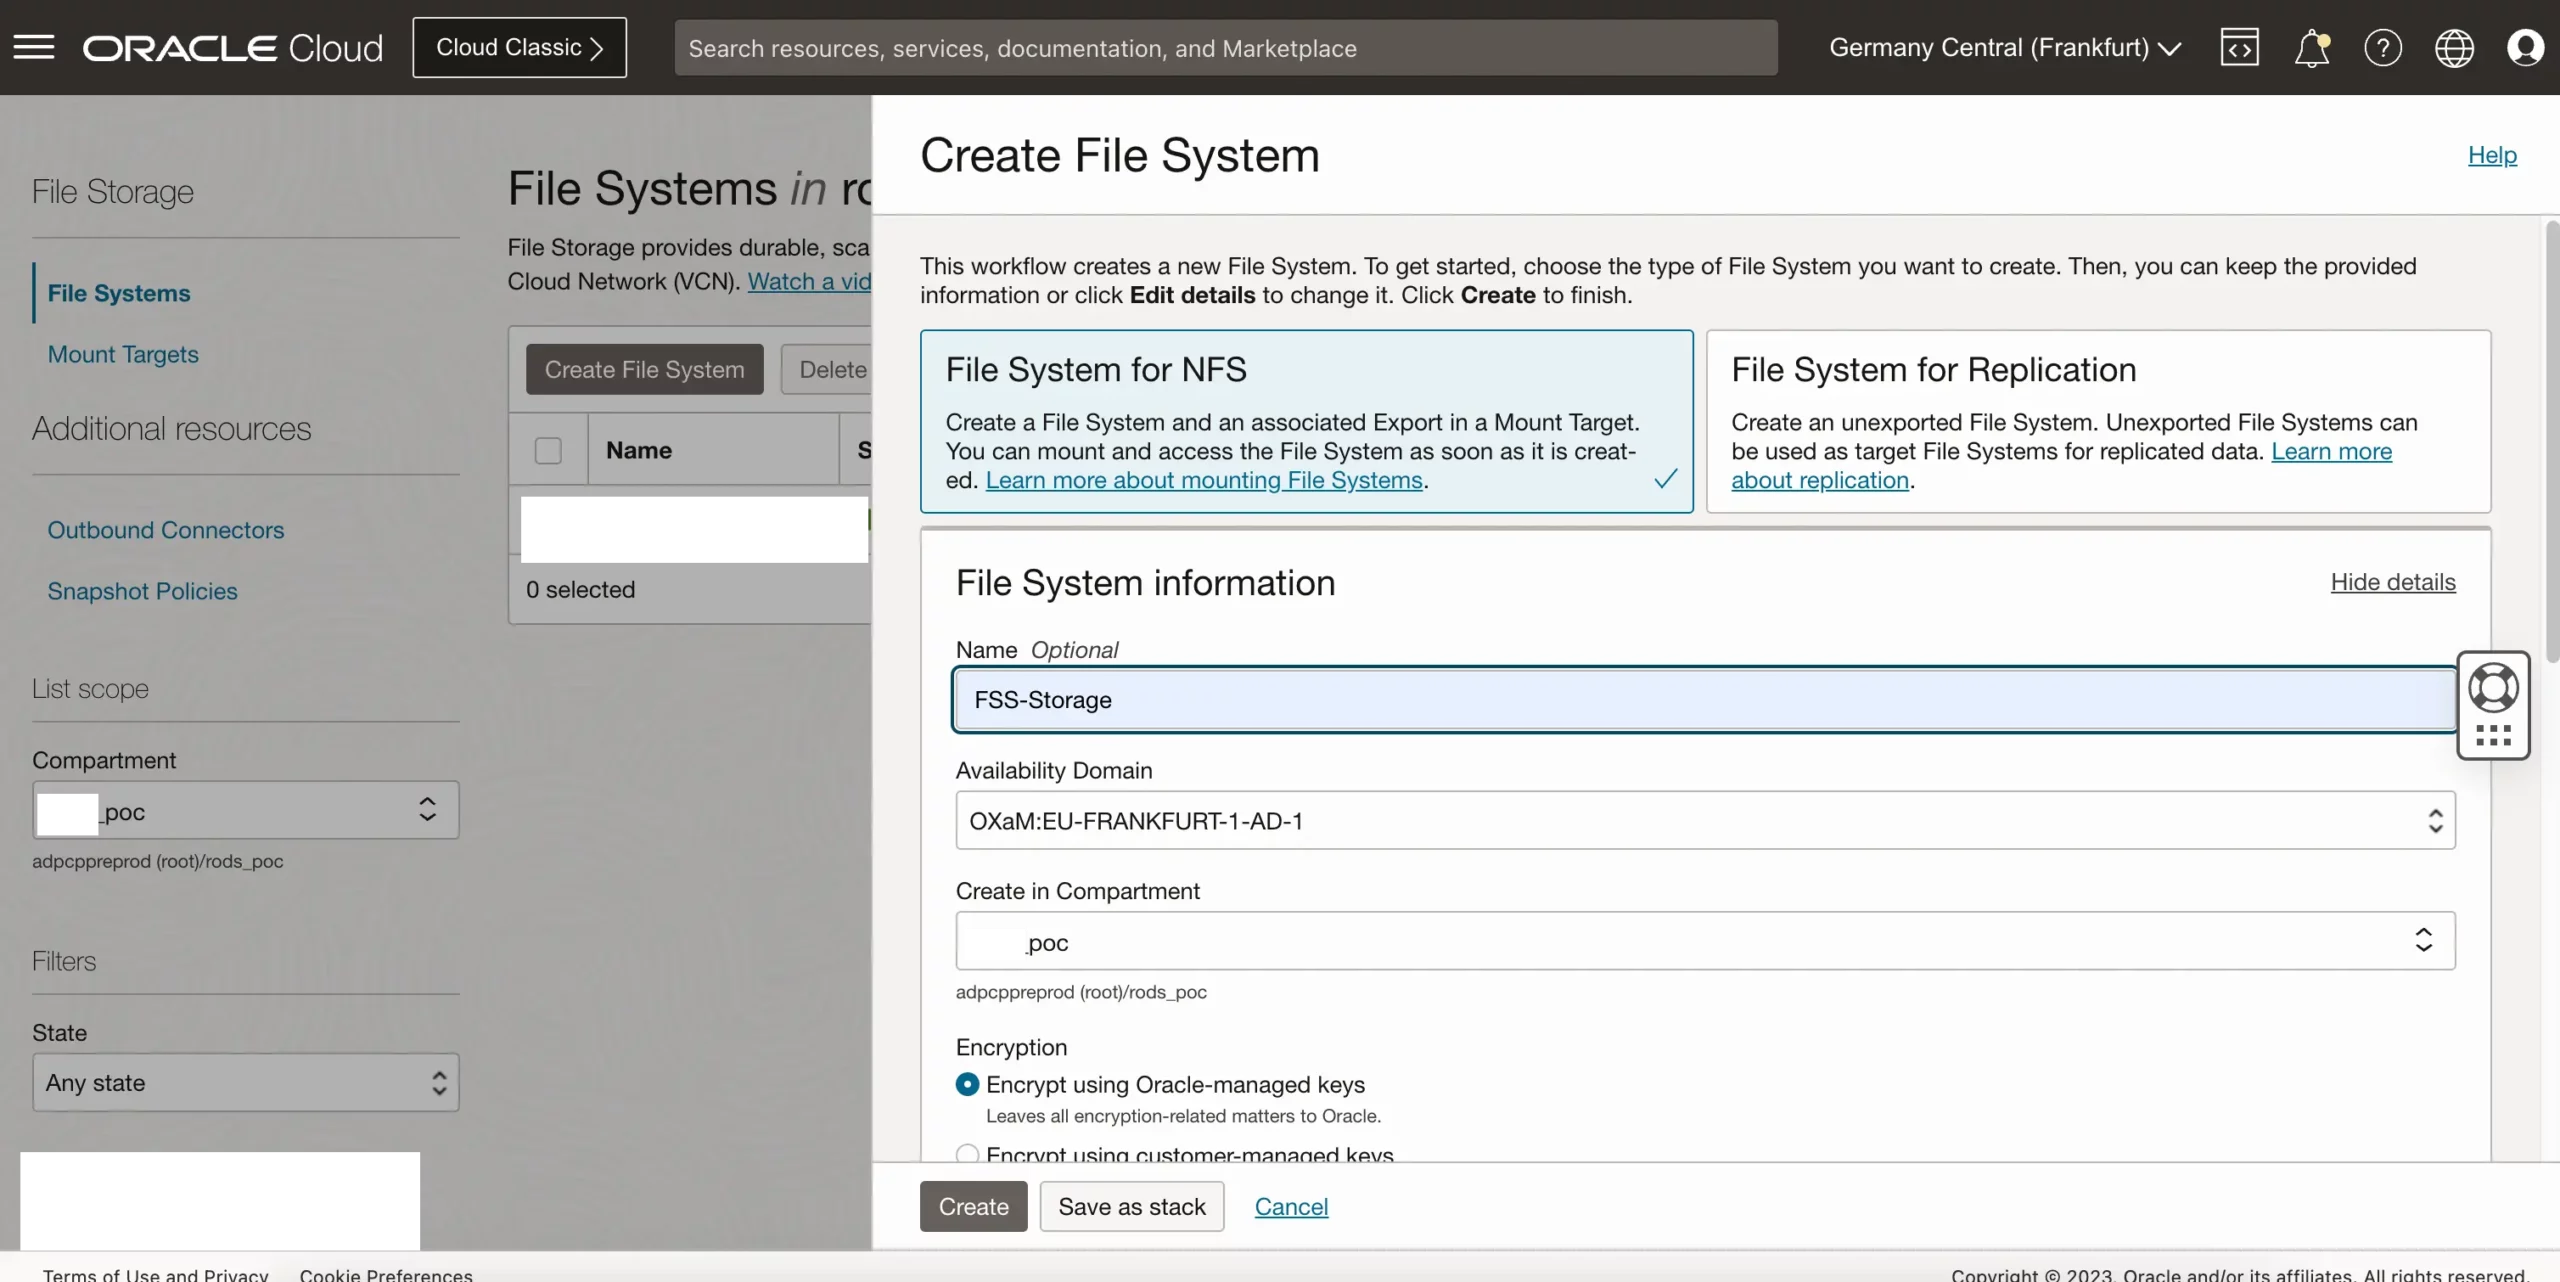
Provision FSS in OCI
The next step involves creating a file system. This can be done by navigating through the OCI console: go to Home, then Storage, followed by File Storage, and select File Systems. Here, you will find the option to Create File System.
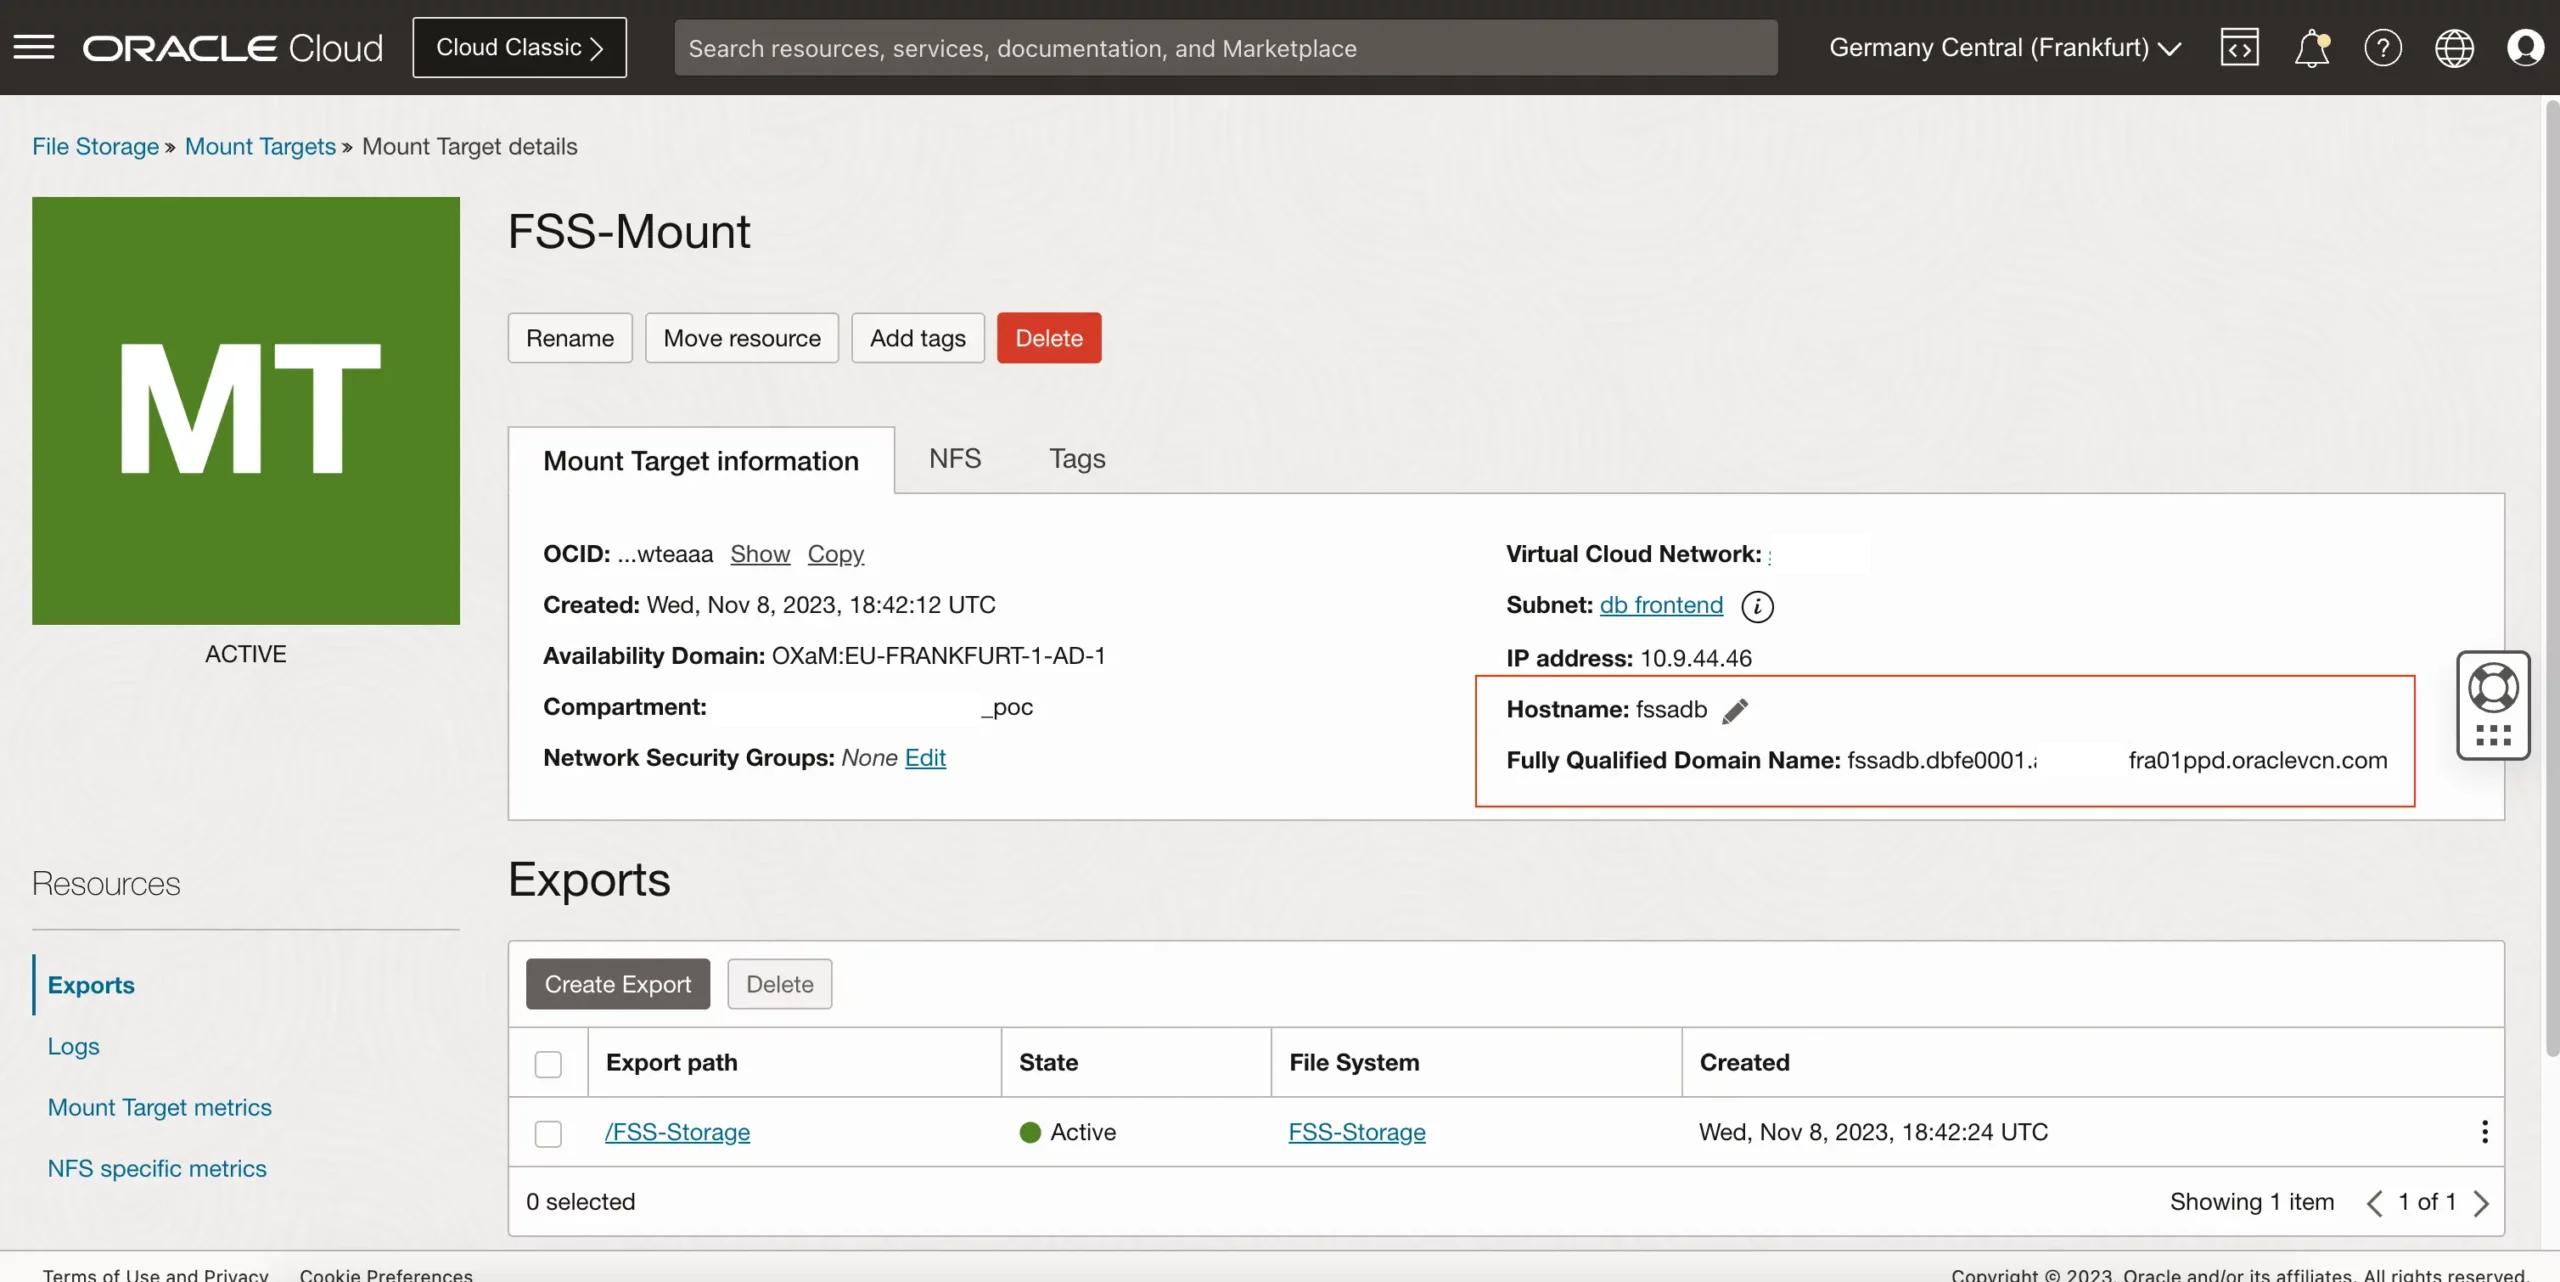
Update FQDN for the mount target
After creating the FSS, update the FQDN using the following steps
File Storage -> Mount Targets -> <yourMountTargetName>
After creating the FSS, update the FQDN using the following steps
File Storage -> Mount Targets -> <yourMountTargetName>
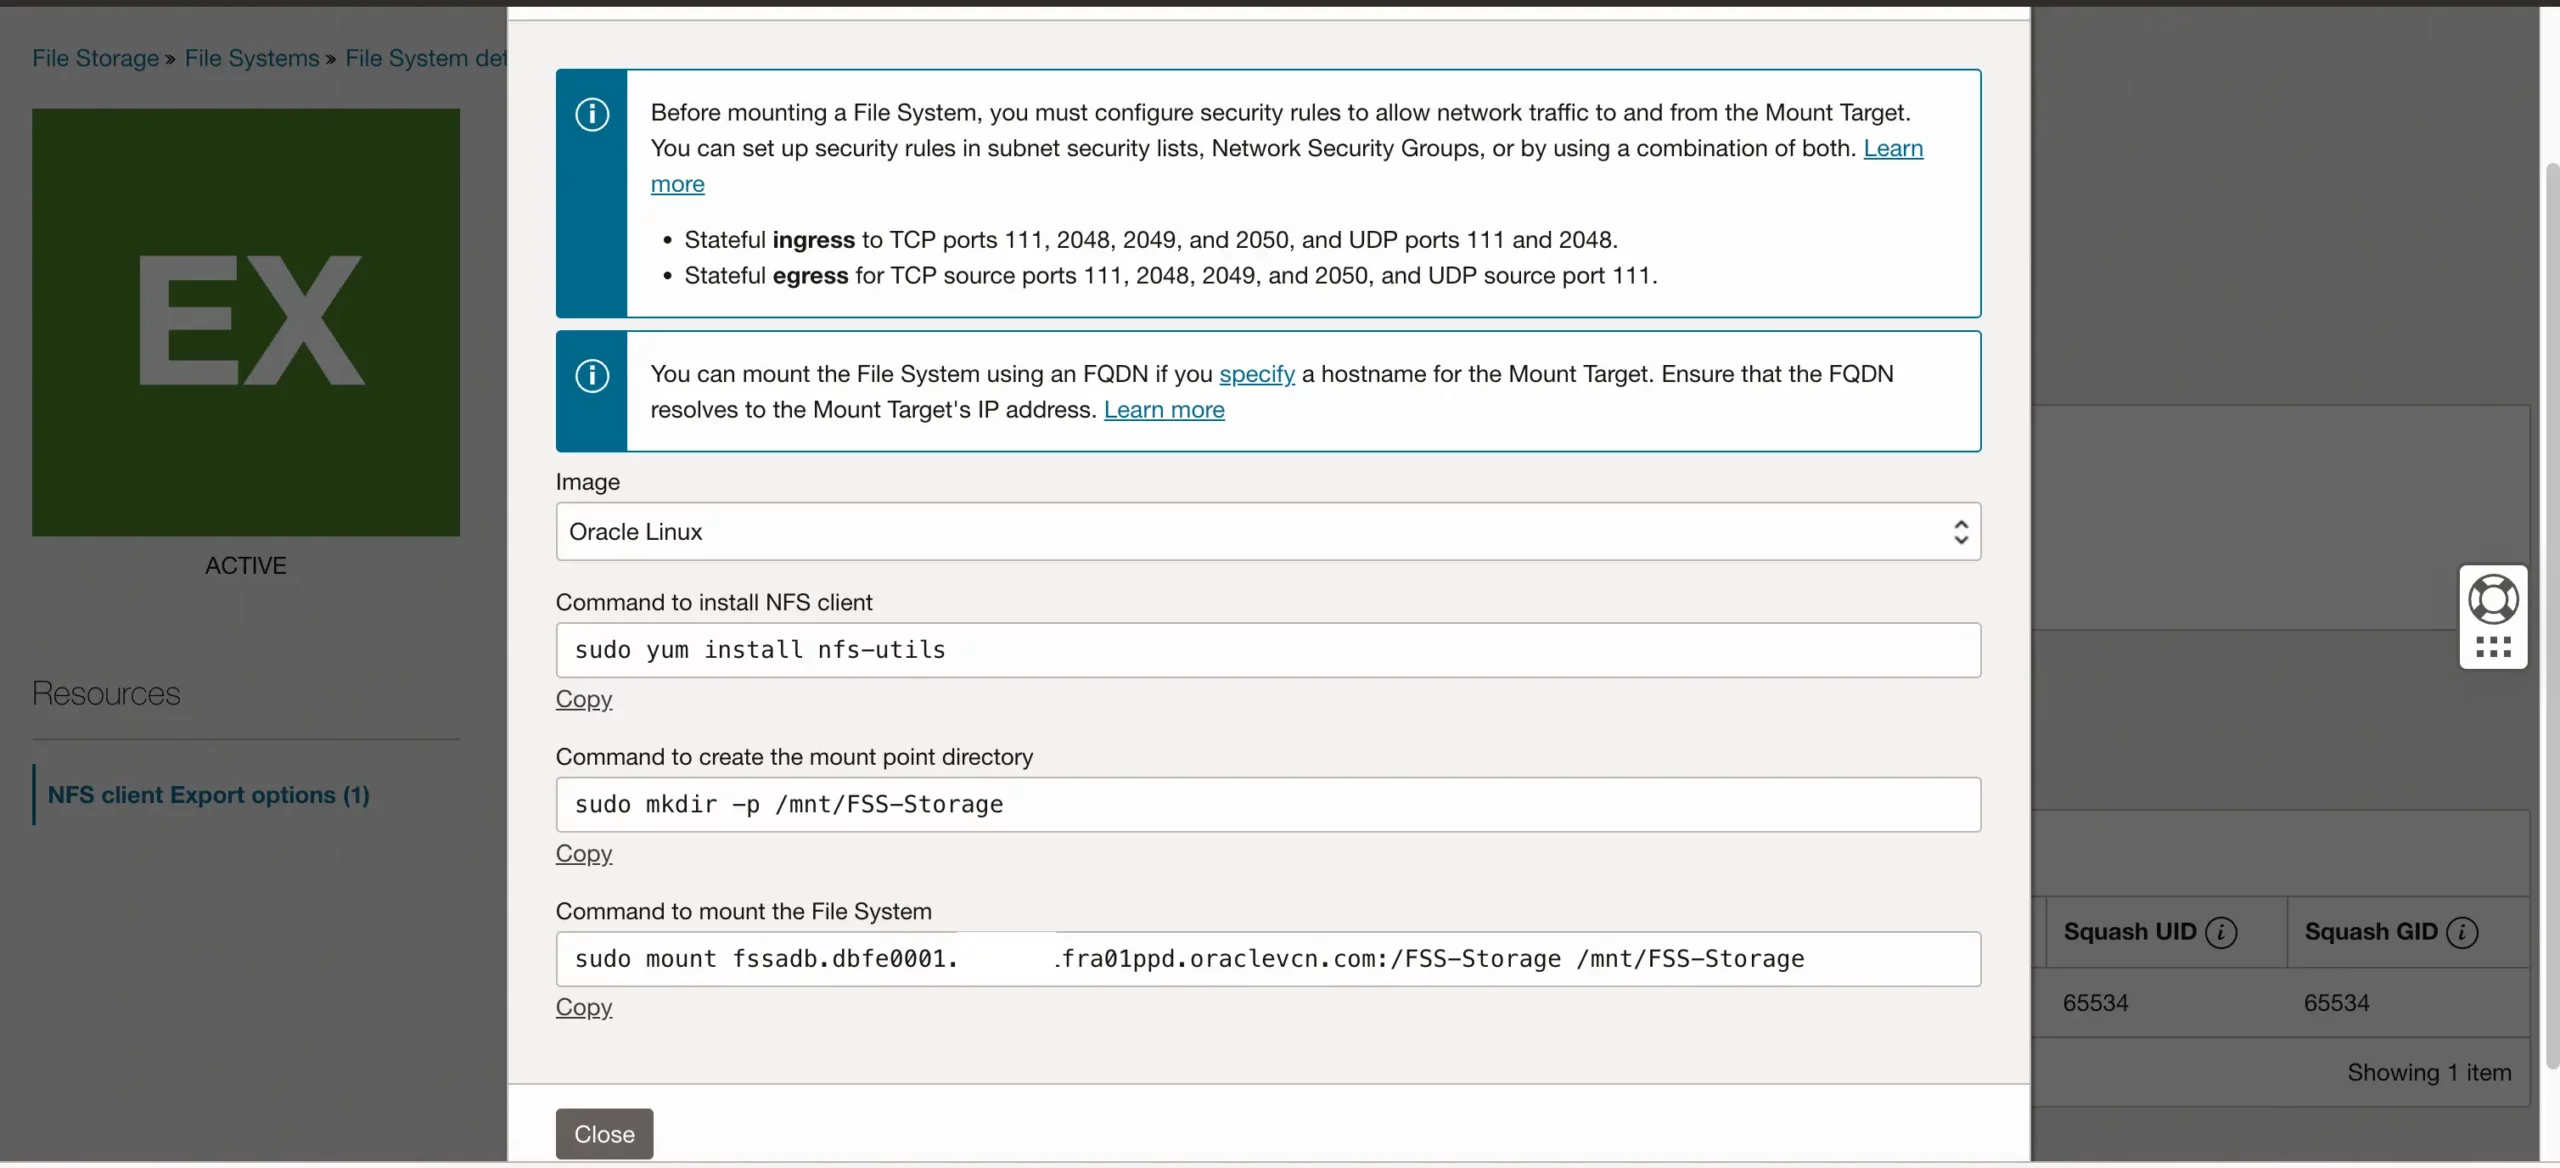
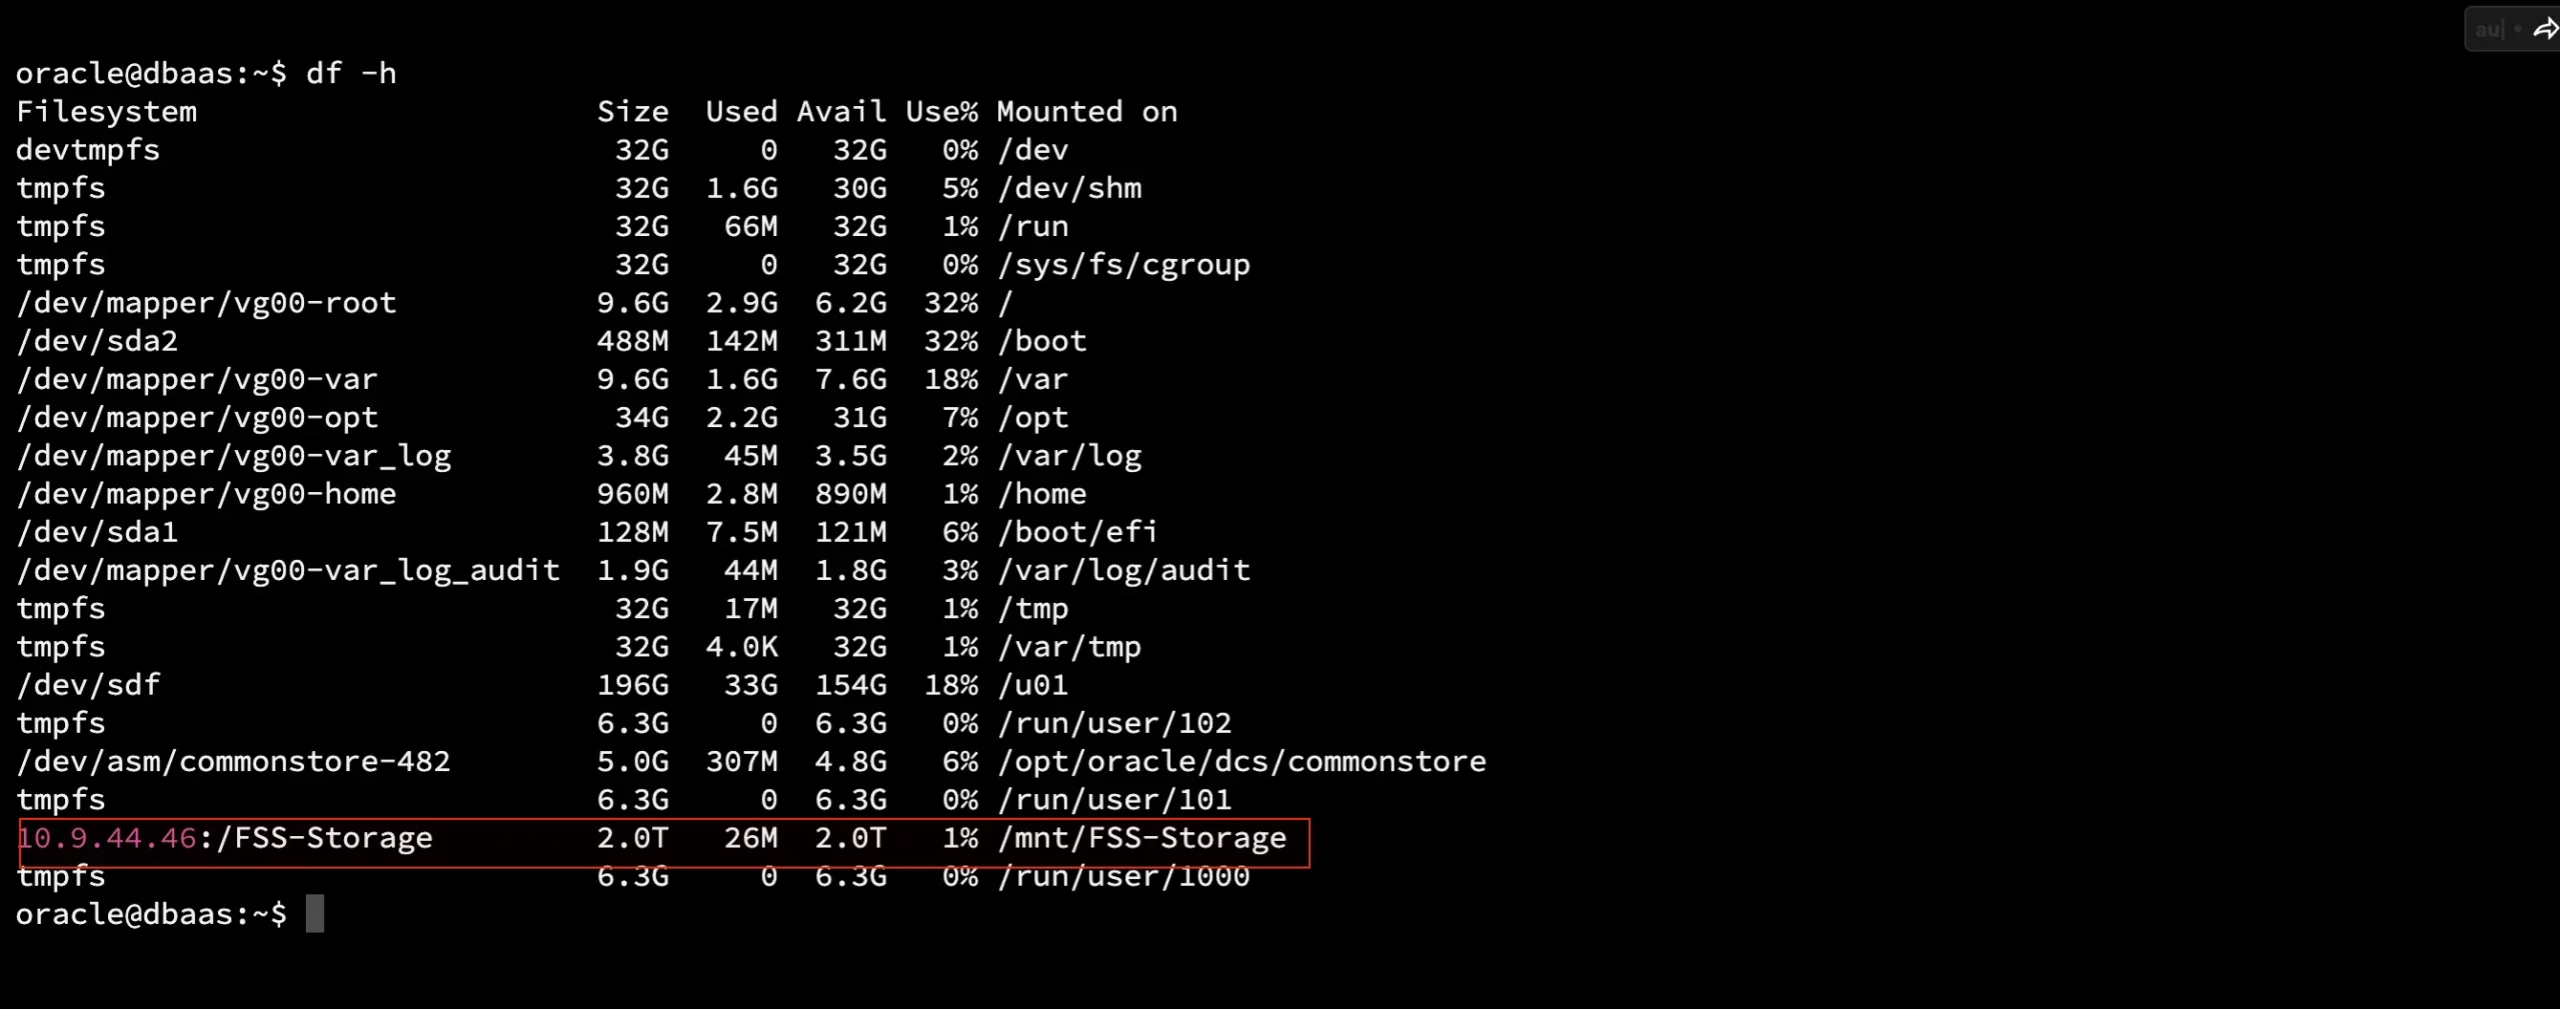
Mount the FSS to the source Database. Here in this example, this would be mounted to DBaaS on OCI
Provision the Autonomous Database with Private Endpoint Access only
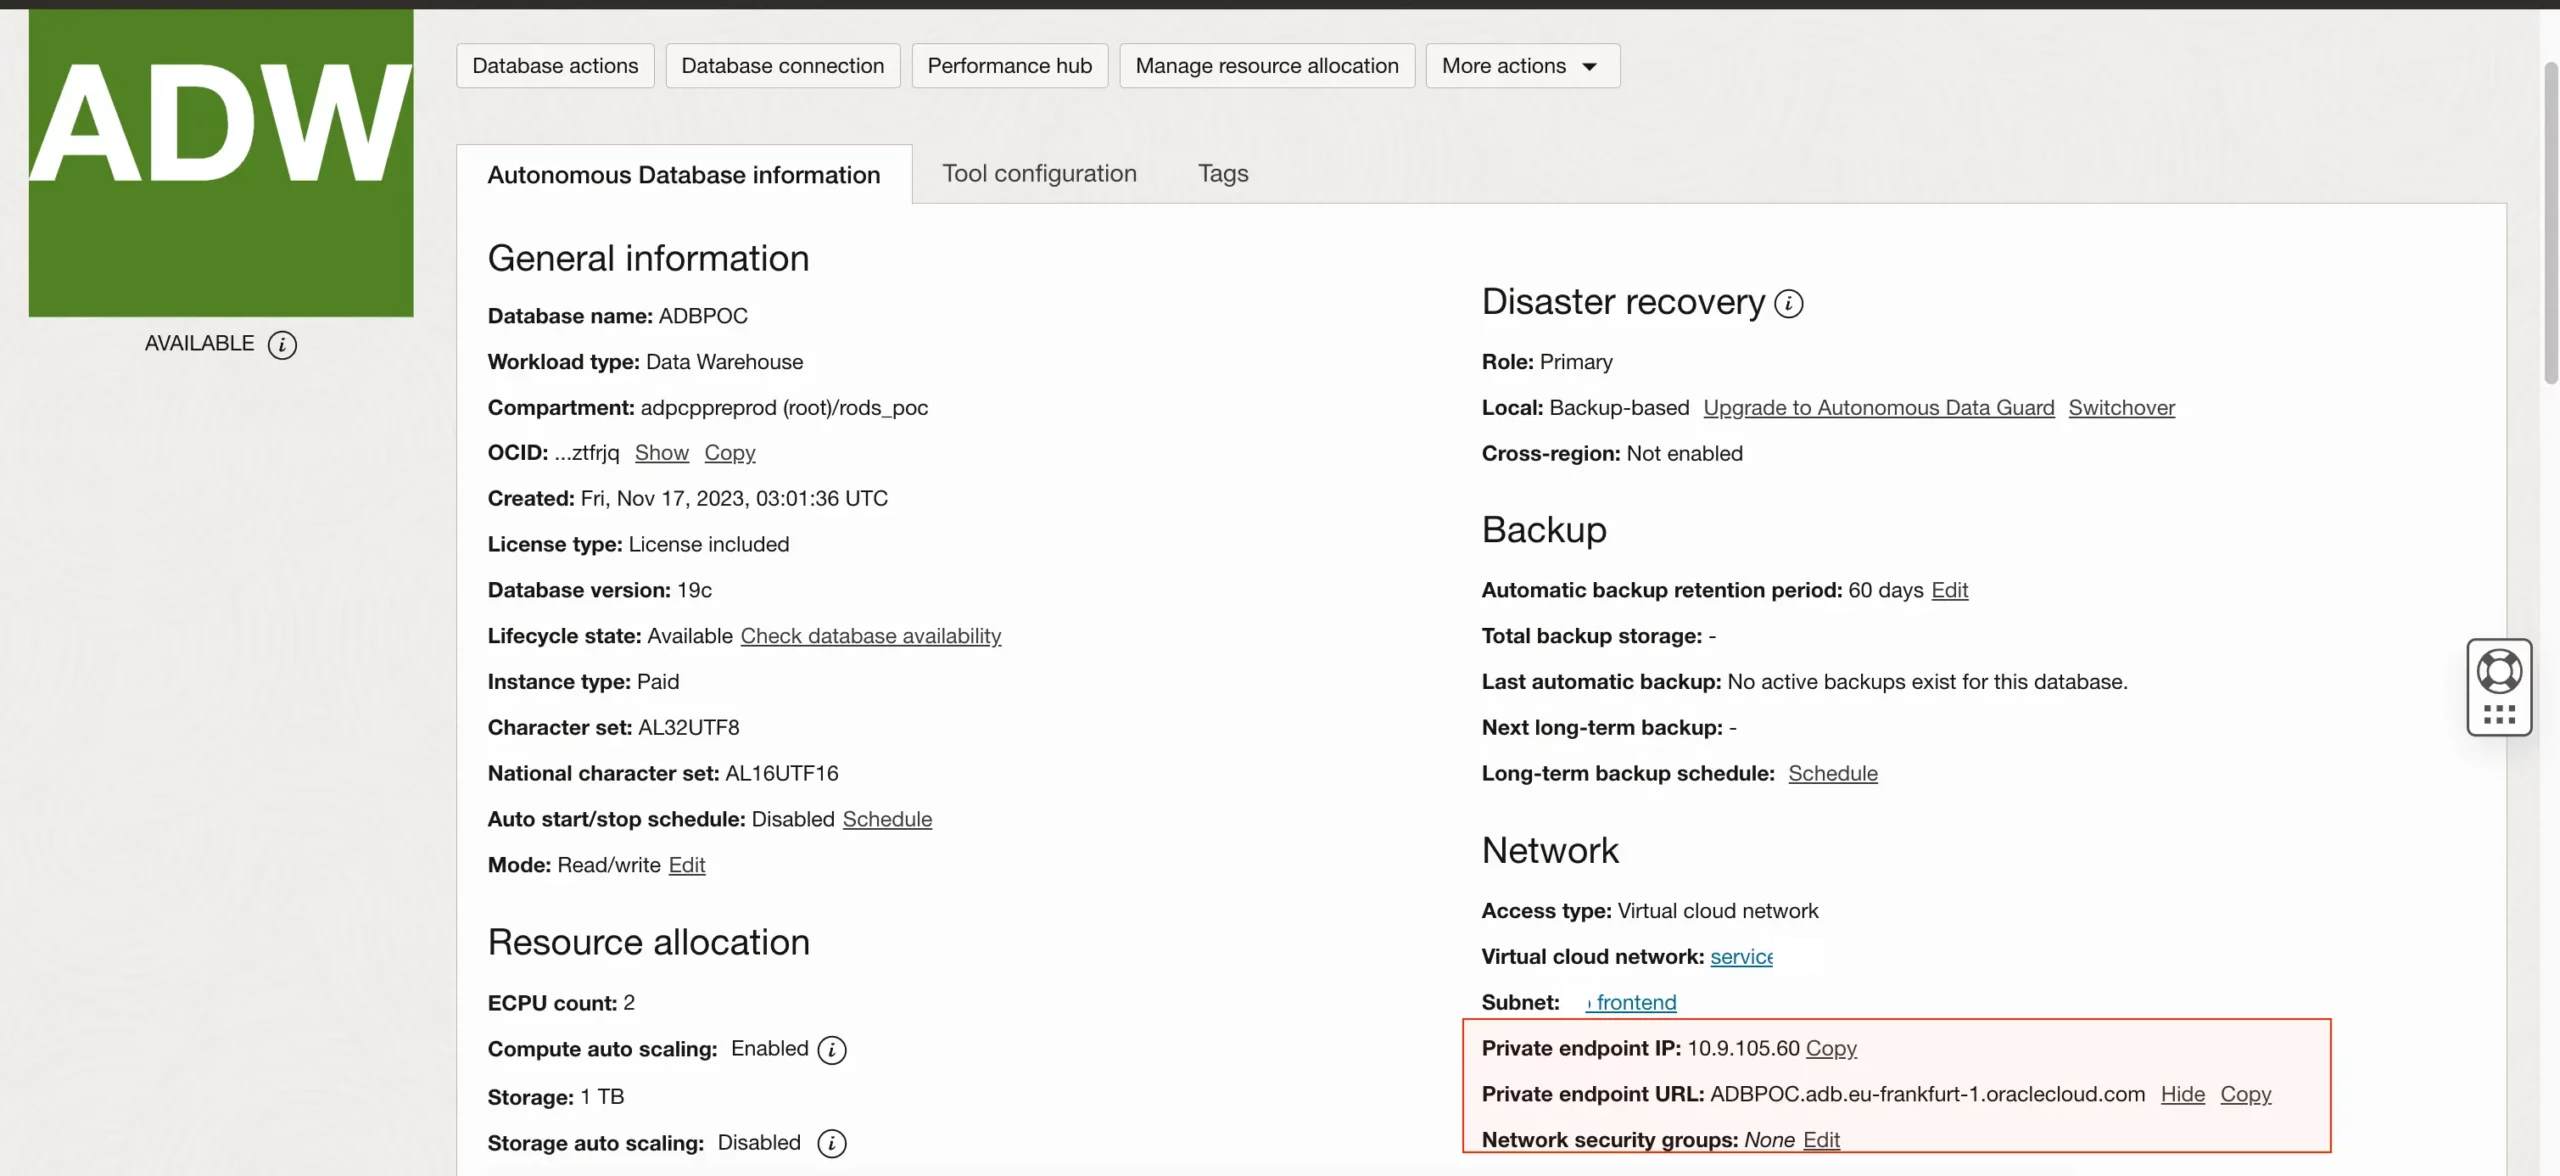
Attach the FSS to ADB
Now in the autonomous database using the DBMS_CLOUD_ADMIN.ATTACH_FILE_SYSTEM procedure, attach the FSS filesystem mount to the FSS_DIR that was created.
					SQL> CREATE OR REPLACE DIRECTORY FSS_DUMP_DIR AS 'FSS';

Directory created.

SQL> BEGIN
  DBMS_CLOUD_ADMIN.ATTACH_FILE_SYSTEM(
    file_system_name => 'FSS',
    file_system_location => 'fssadb.dbfe0001.db01fra01ppd.oraclevcn.com:/FSS-Storage',
    directory_name => 'FSS_DUMP_DIR',
    description => 'OCI NFS'
  );
END ;
/

PL/SQL procedure successfully completed.

SQL> SELECT FILE_SYSTEM_NAME, FILE_SYSTEM_LOCATION, DIRECTORY_PATH FROM DBA_CLOUD_FILE_SYSTEMS;

FILE_SYSTE FILE_SYSTEM_LOCATION                                         DIRECTORY_PATH
---------- ------------------------------------------------------------ ----------------------------------------------------------------------
FSS        fssadb.dbfe0001.db01fra01ppd.oraclevcn.com:/FSS-Storage   /u03/dbfs/0A4FC296356362EBE0632A18000A57F2/data/FSS/
EXPORT FROM SOURCE DATABASE
Now, use the EXPDP command to create an export dump on the source database, ensuring that the dump directory is created in the FSS to store the dump file.
Now, use the EXPDP command to create an export dump on the source database, ensuring that the dump directory is created in the FSS to store the dump file.
					CREATE OR REPLACE DIRECTORY FSS_DUMP_DIR AS '/mnt/FSS-Storage';

GRANT READ, WRITE ON DIRECTORY FSS_DUMP_DIR TO SOE;

directory=FSS_DUMP_DIR
tables=SOE.CUSTOMERS
dumpfile=SOE.dmp
logfile=fss_test.log
exclude=statistics


expdp \"/ as sysdba\" parfile=expfss.par

oracle@dbaas:/mnt/FSS-Storage$ ll
total 26632
-rw-r----- 1 oracle oinstall 26546176 Nov  8 13:02 SOE.dmp
-rw-r--r-- 1   1001 asmdba       1402 Nov  8 19:33 SOE_Imp.log
oracle@dbaas:/mnt/FSS-Storage$
IMPORT THE DUMPFILE INTO AUTONOMOUS DATABASE
Now let us list all the files under the FSS filesystem using DBMS_CLOUD.LIST_FILES and compare the output from the previous section of source FSS.
					SQL> SELECT OBJECT_NAME FROM DBMS_CLOUD.LIST_FILES('FSS_DUMP_DIR');

OBJECT_NAME
--------------------------------------------------------------------------------
SOE.dmp
SOE_Imp.log
Now, use the IMPDP command to import the data from the dump on the target autonomous database that has been created in the FSS.
Please make a note the directory used here is FSS_DUMP_DIR created on FSS
directory=FSS_DUMP_DIR
dumpfile=SOE.dmp
logfile=SOE_Imp.log
REMAP_TABLESPACE=USERS:DATA, EXCLUDE=cluster,indextype,materialized_view,materialized_view_log,materialized_zonemap,db_link
exclude=object_grant TABLE_EXISTS_ACTION=REPLACE
					impdp admin/password@adbpoc_high parfile=imp_adb_pe.par

Import: Release 19.0.0.0.0 - Production on Fri Nov 17 05:24:10 2023
Version 19.3.0.0.0

Copyright (c) 1982, 2019, Oracle and/or its affiliates.  All rights reserved.

Connected to: Oracle Database 19c Enterprise Edition Release 19.0.0.0.0 - Production
Master table "ADMIN"."SYS_IMPORT_FULL_01" successfully loaded/unloaded
Starting "ADMIN"."SYS_IMPORT_FULL_01":  admin/********@adbpoc_high parfile=imp_adb_pe.par
Processing object type TABLE_EXPORT/TABLE/TABLE
Processing object type TABLE_EXPORT/TABLE/TABLE_DATA
. . imported "SOE"."CUSTOMERS"                           25.10 MB  200078 rows
Processing object type TABLE_EXPORT/TABLE/INDEX/INDEX
Processing object type TABLE_EXPORT/TABLE/INDEX/FUNCTIONAL_INDEX/INDEX
Processing object type TABLE_EXPORT/TABLE/CONSTRAINT/CONSTRAINT
Job "ADMIN"."SYS_IMPORT_FULL_01" successfully completed at Fri Nov 17 05:24:24 2023 elapsed 0 00:00:11
SUMMARY: This article showcased the process of utilizing FSS, mounted on the Source Database, for performing a schema export, and further demonstrated how the same FSS can be used on an Autonomous Database to import the data back using IMPDP.
For more information about about Autonomous Database using the NFS please see the oracle official documentation here.
Hope you found this article useful.
Disclaimer: The views expressed on this document are my own and do not necessarily reflect the views of Oracle.
For more information about about Autonomous Database using the NFS please see the oracle official documentation here.
Hope you found this article useful.
Disclaimer: The views expressed on this document are my own and do not necessarily reflect the views of Oracle.