Gluster Shared Storage on OCI for setting up HA
GlusterFS is a distributed file system that allows to create a large-scale, fault-tolerant storage system. It is an adaptable network file system that is ideal for handling data-heavy workloads, including media streaming and cloud storage. It is a free and open-source software that can run on readily available hardware components.
GlusterFS uses a client-server model where the clients access files from the server over the network. The server stores data in bricks, which are logical units that can be combined to create a volume. Each brick represents a directory on a physical disk or storage device.
GlusterFS employs multiple methods to guarantee data reliability and accessibility. For instance, it supports data replication, where data is kept on several servers to ensure that it remains available even if one server fails. Additionally, it enables data striping, where data is divided and stored across multiple servers to enhance performance.
This article outlines the essential procedures for configuring a GlusterFS cluster using Virtual Machines and storage block volumes on Oracle Cloud Infrastructure (OCI). The instructions provided are for a two-node cluster, although you can create as many Gluster nodes as necessary to suit your requirments.
Architecture
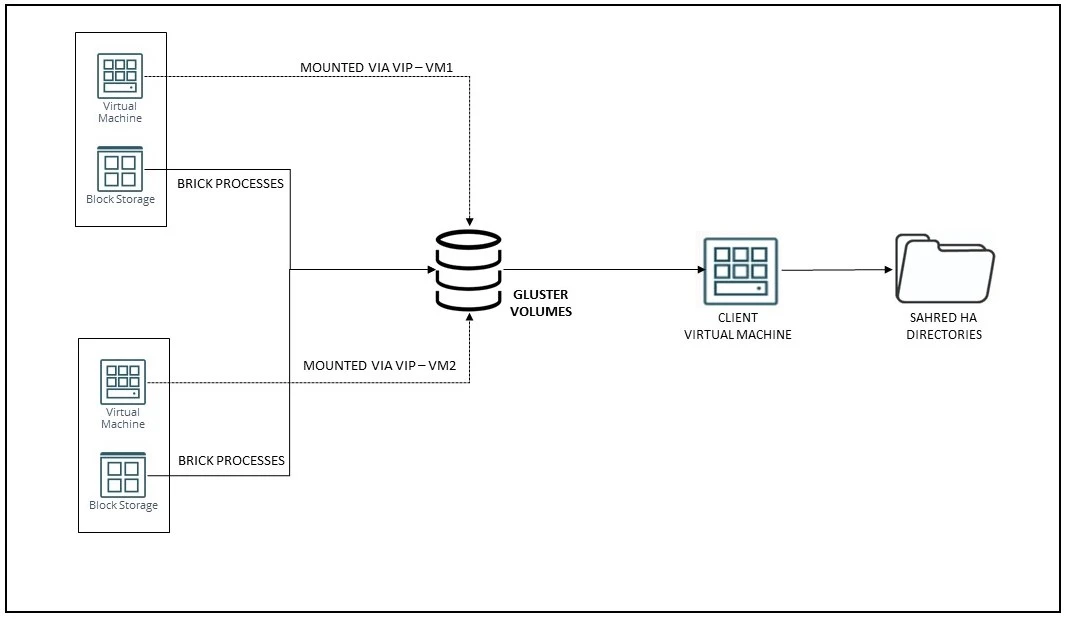
Objective : Mount GlusterFS as as shared storage deriving it from the storage attached to Compute VM1 & VM2
Prerequisites :
Please refer to my blog on how to attach and resize the storage on OCI here.
Prerequisites :
- Compute VM 1 – Running Linux
- Compute VM 2 – Running Linux
- Block Storage attached to VM 1 as XFS – In this example I have provisioned 200 GB
- Block Storage attached to VM 2 as XFS – In this example I have provisioned 200 GB
- Compute Client VM 3 – Running Linux
Please refer to my blog on how to attach and resize the storage on OCI here.
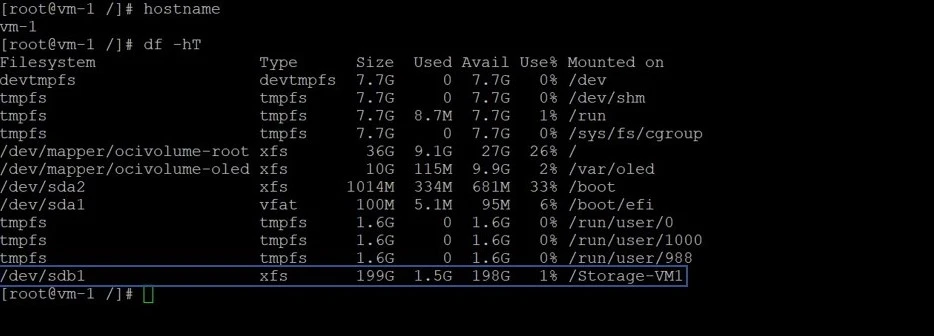
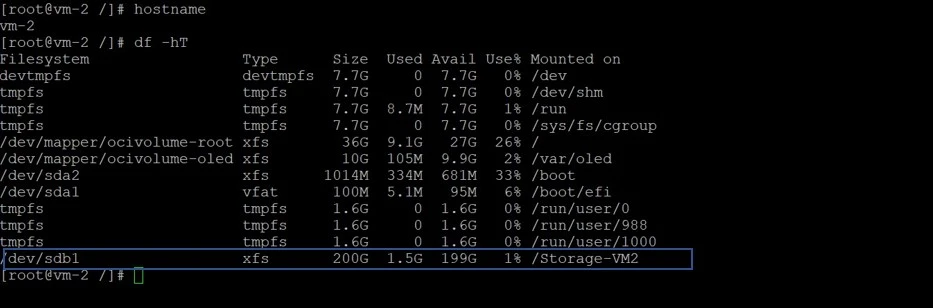
STEP 1 : Make sure VM-1 and VM-2 has xfs Storage attached.
Here is the screen shot of df -hT
Here is the screen shot of df -hT
STEP 2 : Install the Gluster Packages
Make sure to execute these on both VM-1 and VM-2
sudo dnf install oracle-gluster-release-el8 -y
sudo dnf config-manager –enable ol8_gluster_appstream ol8_baseos_latest ol8_appstream
Modify the /etc/yum.repos.d/oracle-gluster-ol8.repo for correct baseurl path
[ol8_gluster_appstream] name=Oracle Linux $releasever Gluster Appstream ($basearch) baseurl=https://yum.oracle.com/repo/OracleLinux/OL8/gluster/appstream/$basearch/
gpgkey=file:///etc/pki/rpm-gpg/RPM-GPG-KEY-oracle
gpgcheck=1
enabled=1
Install the Gluster server packages
sudo dnf install @glusterfs/server -y
Enable the Gluster server service
sudo systemctl enable –now glusterd
To enable communication for Gluster, Configure the firewall to allow traffic on the ports
sudo firewall-cmd –permanent –add-service=glusterfs
sudo firewall-cmd –reload
Start the gluster service
sudo systemctl start glusterd.service
sudo systemctl status glusterd.service
STEP 3 : Create trusted storage pool
					[root@vm-1 /]# gluster peer probe vm-2
peer probe: success
[root@vm-1 /]# sudo gluster peer status
Number of Peers: 1

Hostname: vm-2
Uuid: 6d9821f3-b03b-451c-b09f-2fd02010a49d
State: Peer in Cluster (Connected)
[root@vm-1 /]# sudo gluster pool list
UUID                                    Hostname        State
6d9821f3-b03b-451c-b09f-2fd02010a49d    vm-2            Connected
4f78fc55-6d0d-43c3-b21e-23122b305b11    localhost       Connected
[root@vm-1 /]#
STEP 4 : Create GLUSTER volume
					mkdir -p /Storage-VM1/rep_vol
mkdir -p /Storage-VM2/rep_vol

[root@vm-1 Storage-VM1]# gluster volume create REP_VOLUME replica 2 vm-1:/Storage-VM1/rep_vol vm-2:/Storage-VM2/rep_vol
Replica 2 volumes are prone to split-brain. Use Arbiter or Replica 3 to avoid this. See: http://docs.gluster.org/en/latest/Administrator%20Guide/Split%20brain%20and%20ways%20to%20deal%20with%20it/.
Do you still want to continue?
 (y/n) y
volume create: REP_VOLUME: success: please start the volume to access data


[root@vm-1 Storage-VM1]# gluster volume start REP_VOLUME
volume start: REP_VOLUME: success

[root@vm-1 Storage-VM1]# gluster volume status REP_VOLUME
Status of volume: REP_VOLUME
Gluster process                             TCP Port  RDMA Port  Online  Pid
------------------------------------------------------------------------------
Brick vm-1:/Storage-VM1/rep_vol             49152     0          Y       37503
Brick vm-2:/Storage-VM2/rep_vol             49152     0          Y       37882
Self-heal Daemon on localhost               N/A       N/A        Y       37520
Self-heal Daemon on vm-2                    N/A       N/A        Y       37899

Task Status of Volume REP_VOLUME
------------------------------------------------------------------------------
There are no active volume tasks

[root@vm-1 Storage-VM1]# gluster volume info

Volume Name: REP_VOLUME
Type: Replicate
Volume ID: 8d03e53c-c256-4b97-ae58-d837af02c86e
Status: Started
Snapshot Count: 0
Number of Bricks: 1 x 2 = 2
Transport-type: tcp
Bricks:
Brick1: vm-1:/Storage-VM1/rep_vol
Brick2: vm-2:/Storage-VM2/rep_vol
Options Reconfigured:
storage.fips-mode-rchecksum: on
transport.address-family: inet
nfs.disable: on
performance.client-io-threads: off


[root@vm-1 Storage-VM1]# gluster pool list
UUID                                    Hostname        State
6d9821f3-b03b-451c-b09f-2fd02010a49d    vm-2            Connected
4f78fc55-6d0d-43c3-b21e-23122b305b11    localhost       Connected

[root@vm-2 rep_vol]# gluster pool list
UUID                                    Hostname                                State
4f78fc55-6d0d-43c3-b21e-23122b305b11    vm-1.sub10051757060.ggvcn.oraclevcn.com Connected
6d9821f3-b03b-451c-b09f-2fd02010a49d    localhost                               Connected
STEP 5 : Gluster Setup on Compute VM-3 as a CLIENT
					[opc@client-vm-3 ~]$ sudo dnf install oracle-gluster-release-el8 -y
[opc@client-vm-3 ~]$ sudo dnf config-manager --enable ol8_gluster_appstream ol8_baseos_latest ol8_appstream

Modify the /etc/yum.repos.d/oracle-gluster-ol8.repo for correct baseurl path

[ol8_gluster_appstream]
name=Oracle Linux $releasever Gluster Appstream ($basearch)
baseurl=https://yum.oracle.com/repo/OracleLinux/OL8/gluster/appstream/$basearch/
gpgkey=file:///etc/pki/rpm-gpg/RPM-GPG-KEY-oracle
gpgcheck=1
enabled=1


[root@client-vm-3 yum.repos.d]# sudo dnf module enable glusterfs -y
Oracle Linux 8 Gluster Appstream (x86_64)                                                                         241 kB/s |  88 kB     00:00
Oracle Linux 8 BaseOS Latest (x86_64)                                                                             154 kB/s | 3.6 kB     00:00
Oracle Linux 8 Application Stream (x86_64)                                                                        119 kB/s | 3.9 kB     00:00
Oracle Linux 8 Addons (x86_64)                                                                                    100 kB/s | 3.0 kB     00:00
Dependencies resolved.

[root@client-vm-3 yum.repos.d]# sudo dnf install @glusterfs/client -y
Last metadata expiration check: 0:00:49 ago on Wed 03 May 2023 11:02:23 PM GMT.
Dependencies resolved.
==================================================================================================================================================
 Package                             Architecture      Version                                             Repository                        Size
==================================================================================================================================================
Installing group/module packages:
 glusterfs                           x86_64            8.6-2.module+el8.5.0+20523+1496d785                 ol8_gluster_appstream            657 k
STEP 6 : KEEP ALIVE SETUP
The idea behind Keepalived is to have multiple servers in a cluster, with one acting as the master and the others as backup nodes. The master node manages the virtual IP address, that is used to provide access to the service being offered. If the master node fails, one of the backup nodes takes over as the new master, and continues to manage the virtual IP address.
The idea behind Keepalived is to have multiple servers in a cluster, with one acting as the master and the others as backup nodes. The master node manages the virtual IP address, that is used to provide access to the service being offered. If the master node fails, one of the backup nodes takes over as the new master, and continues to manage the virtual IP address.
					[opc@vm-1 ~]$ sudo dnf install keepalived
Last metadata expiration check: 1:45:01 ago on Wed 03 May 2023 09:58:33 PM GMT.
Dependencies resolved.
==================================================================================================================================================
 Package                                    Architecture           Version                                Repository                         Size
==================================================================================================================================================
Installing:
 keepalived                                 x86_64                 2.1.5-9.el8                            ol8_appstream                     536 k
Installed:
  keepalived-2.1.5-9.el8.x86_64                     mariadb-connector-c-3.1.11-2.el8_3.x86_64   mariadb-connector-c-config-3.1.11-2.el8_3.noarch
  net-snmp-agent-libs-1:5.8-25.0.2.el8_7.1.x86_64   net-snmp-libs-1:5.8-25.0.2.el8_7.1.x86_64

Complete!


[opc@vm-1 ~]$ sudo systemctl enable --now keepalived
Created symlink /etc/systemd/system/multi-user.target.wants/keepalived.service → /usr/lib/systemd/system/keepalived.service.


cp /etc/keepalived/keepalived.conf keepalived.conf_org

Truncate the keepalived.conf
>keepalived.conf

vi keepalived.conf

10.0.0.200/24 is the Virtual IP

vrrp_instance VI_1 {
    state MASTER
    interface ens3
    virtual_router_id 51
    priority 255
	advert_int 1
	authentication {
			auth_type PASS
			auth_pass 12345
    }
    virtual_ipaddress {
        10.0.0.200/24
    }
}


vrrp_instance VI_1 {
    state BACKUP
    interface ens3
    virtual_router_id 1
    priority 254
	advert_int 51
	authentication {
			auth_type PASS
			auth_pass 12345
    }
    virtual_ipaddress {
        10.0.0.200/24
    }
}

systemctl stop keepalived.service
systemctl start keepalived.service
systemctl status keepalived.service


[root@vm-1 keepalived]# systemctl start keepalived.service
[root@vm-1 keepalived]# systemctl status keepalived.service
● keepalived.service - LVS and VRRP High Availability Monitor
   Loaded: loaded (/usr/lib/systemd/system/keepalived.service; enabled; vendor preset: disabled)
   Active: active (running) since Thu 2023-05-04 00:48:10 GMT; 3s ago
  Process: 15993 ExecStart=/usr/sbin/keepalived $KEEPALIVED_OPTIONS (code=exited, status=0/SUCCESS)
 Main PID: 15994 (keepalived)
    Tasks: 2 (limit: 99948)
   Memory: 12.0M
   CGroup: /system.slice/keepalived.service
           ├─15994 /usr/sbin/keepalived -D
           └─15995 /usr/sbin/keepalived -D

May 04 00:48:10 vm-1 Keepalived_vrrp[15995]: VRRP sockpool: [ifindex(  2), family(IPv4), proto(112), fd(11,12)]
May 04 00:48:10 vm-1 Keepalived_vrrp[15995]: (VI_1) Receive advertisement timeout
May 04 00:48:10 vm-1 Keepalived_vrrp[15995]: (VI_1) Entering MASTER STATE
May 04 00:48:10 vm-1 Keepalived_vrrp[15995]: (VI_1) setting VIPs.
May 04 00:48:10 vm-1 Keepalived_vrrp[15995]: (VI_1) Sending/queueing gratuitous ARPs on ens3 for 10.0.0.200
May 04 00:48:10 vm-1 Keepalived_vrrp[15995]: Sending gratuitous ARP on ens3 for 10.0.0.200
May 04 00:48:10 vm-1 Keepalived_vrrp[15995]: Sending gratuitous ARP on ens3 for 10.0.0.200
May 04 00:48:10 vm-1 Keepalived_vrrp[15995]: Sending gratuitous ARP on ens3 for 10.0.0.200
May 04 00:48:10 vm-1 Keepalived_vrrp[15995]: Sending gratuitous ARP on ens3 for 10.0.0.200
May 04 00:48:10 vm-1 Keepalived_vrrp[15995]: Sending gratuitous ARP on ens3 for 10.0.0.200
STEP 7 : List the Virtual IP Address from the LINUX VM
VIP is : 10.0.0.200/24
VIP is : 10.0.0.200/24
					[root@vm-1 keepalived]# ip addr | grep "^ *inet "
    inet 127.0.0.1/8 scope host lo
    inet 10.0.0.133/24 brd 10.0.0.255 scope global dynamic ens3
    inet 10.0.0.200/24 scope global secondary ens3
STEP 8 : Mount the gluster volume on Client VM-3 using VIP
VIP is : 10.0.0.200/24
VIP is : 10.0.0.200/24
					mkdir /REP_STORAGE

SYNTAX : mount -t glusterfs VIP:/gluster_volume /directory

mount -t glusterfs 10.0.0.200:REP_VOLUME /REP_STORAGE

df -hT | grep gluster
10.0.0.200:REP_VOLUME      fuse.glusterfs  199G  3.5G  196G   2% /REP_STORAGE
STEP 9 : TESTING GlusterFS
- Create files in the /REP_STORAGE directory . You can use the touch command to create empty files, or the cp command to copy existing files to the directory.
- Take VM-1 down by shutting it down and verify the /REP_STORAGE is still mounted on Client-VM-3
- Bring VM-1 back up and verify that the /REP_STORAGE directory is still mounted and that the files you created earlier are still present.
- Take VM-2 down by shutting it down verify the /REP_STORAGE is still mounted on Client-VM-3
- Bring VM-2 back up and verify that the /REP_STORAGE directory is still mounted and that the files you created earlier are still present.
SUMMARY
By following these steps, you can create a highly available shared storage solution using GlusterFS with a VIP. This setup ensures that the storage is available even if one of the nodes fails, and provides a seamless failover mechanism to ensure that the storage remains accessible.
For more information see the oracle official documentation here
Hope you found this article useful.
Disclaimer: The views expressed on this document are my own and do not necessarily reflect the views of Oracle.
For more information see the oracle official documentation here
Hope you found this article useful.
Disclaimer: The views expressed on this document are my own and do not necessarily reflect the views of Oracle.