OCI GoldenGate Service To Hadoop HDFS
Use case: OCI GoldenGate Service To Hadoop HDFS article details out Step-by-step guide for replication of data. The scope of this Blog is limited to Replicat information.
This blog article, provides a simplified approach in streaming data into Hadoop HDFS using OCI GoldenGate Services. OCI GoldenGate offers a streamlined and effective approach to extract data from multiple sources and transfer it to BigData Targets, including Hadoop HDFS. With support for diverse data types and real-time data synchronization, OCI GoldenGate minimizes data latency and guarantees data accuracy.
This blog article, provides a simplified approach in streaming data into Hadoop HDFS using OCI GoldenGate Services. OCI GoldenGate offers a streamlined and effective approach to extract data from multiple sources and transfer it to BigData Targets, including Hadoop HDFS. With support for diverse data types and real-time data synchronization, OCI GoldenGate minimizes data latency and guarantees data accuracy.
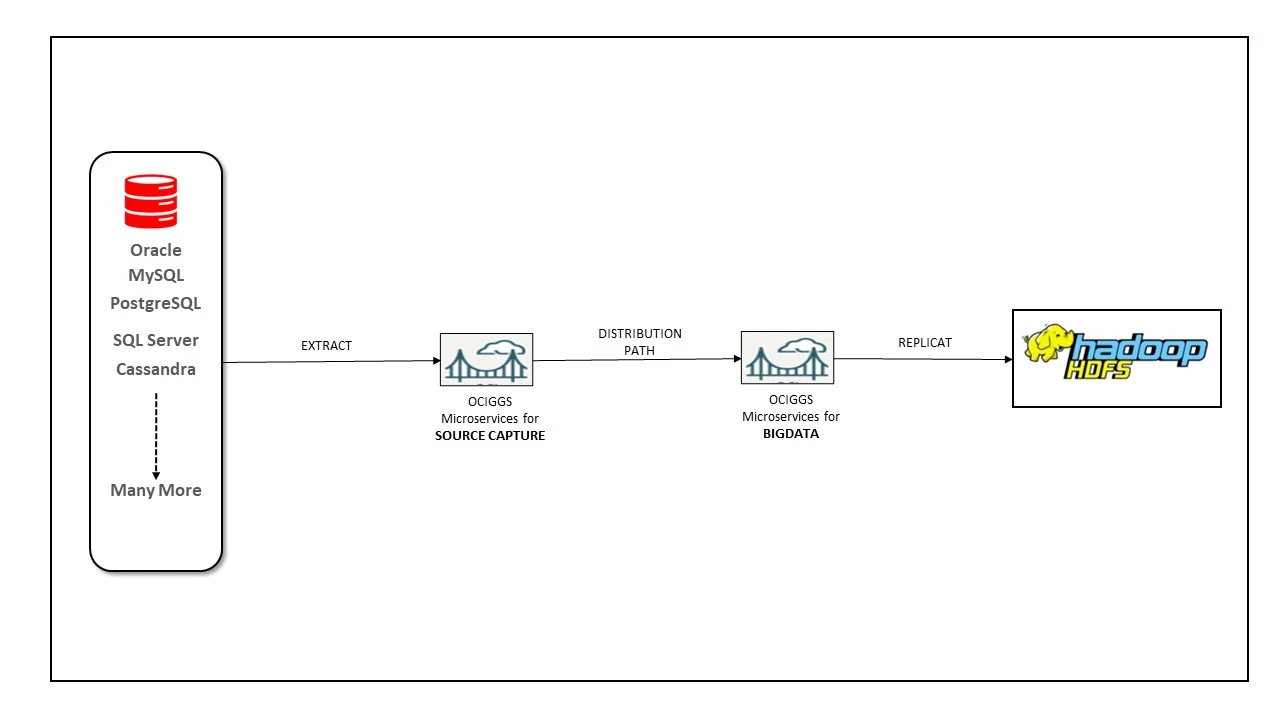
Architecture :
Prerequisites :
To fully comprehend the content of this blog, let us first install Hadoop and configure the HDFS and replicat data into HDFS.
If you already have Hadoop installed, you can skip the following subtopic (Install And Configure Hadoop On Oracle Linux 8)
- Provision respective source OCI GoldenGate service to capture the data with Extracts.
- Create Distribution Path to Target OCI GoldenGate service BIGDATA to send the trail files across deployments.
Please check the other article on how to Create Distribution Path to send Trail files push the trail files across deployments. - Target Hadoop cluster Host information.
To fully comprehend the content of this blog, let us first install Hadoop and configure the HDFS and replicat data into HDFS.
If you already have Hadoop installed, you can skip the following subtopic (Install And Configure Hadoop On Oracle Linux 8)
Install and Configure Hadoop on Oracle Linux 8
Apache Hadoop is a framework that is open source and enables the distributed storage and processing of large volumes of data across clusters of computers. The data is stored in the Hadoop Distributed File System (HDFS), and processing of this data is achieved through MapReduce. Additionally, YARN serves as an interface for requesting and allocating resources within the Hadoop cluster.
Use the following command to create the new user and group:
					[root@hadoop-hdfs opc]# useradd ogg
[root@hadoop-hdfs opc]# passwd ogg
Changing password for user ogg.
New password:
Retype new password:
passwd: all authentication tokens updated successfully.
Install Java and JDK
					[root@hadoop-hdfs opc]# dnf install java-11-openjdk

[root@hadoop-hdfs opc]# java -version
openjdk version "11.0.19" 2023-04-18 LTS
OpenJDK Runtime Environment (Red_Hat-11.0.19.0.7-2.0.1) (build 11.0.19+7-LTS)
OpenJDK 64-Bit Server VM (Red_Hat-11.0.19.0.7-2.0.1) (build 11.0.19+7-LTS, mixed mode, sharing)
Configure passwordless SSH
[root@hadoop-hdfs opc]# rpm -qa | grep openssh*
Login in to OGG user and Generate Public and Private Key Pairs
					[opc@hadoop-hdfs ~]$ su - ogg
Password:

[ogg@hadoop-hdfs ~]$

$ ssh-keygen -t rsa
$ cat ~/.ssh/id_rsa.pub >> ~/.ssh/authorized_keys
$ chmod 640 ~/.ssh/authorized_keys
Install and set Hadoop 3.x version and configure the associated XML files, follow the steps below:
					# wget https://archive.apache.org/dist/hadoop/common/hadoop-3.3.0/hadoop-3.3.0.tar.gz
# tar -xzvf hadoop-3.3.0.tar.gz
Setup Environment variables in bash_profile
					export HADOOP_HOME=/home/ogg/hadoop-3.3.0
export HADOOP_INSTALL=$HADOOP_HOME
export HADOOP_MAPRED_HOME=$HADOOP_HOME
export HADOOP_COMMON_HOME=$HADOOP_HOME
export HADOOP_HDFS_HOME=$HADOOP_HOME
export YARN_HOME=$HADOOP_HOME
export HADOOP_COMMON_LIB_NATIVE_DIR=$HADOOP_HOME/lib/native
export PATH=$PATH:$HADOOP_HOME/sbin:$HADOOP_HOME/bin
export HADOOP_OPTS="-Djava.library.path=$HADOOP_HOME/lib/native"
Edit the hadoop-env.sh file in /home/ogg/hadoop-3.3.0/etc/hadoop
Add the below 2 lines
Add the below 2 lines
					export JAVA_HOME=${JAVA_HOME:-"/usr/lib/jvm/java-11-openjdk"}
export HADOOP_CONF_DIR=${HADOOP_CONF_DIR:-"/home/ogg/hadoop-3.3.0/etc/hadoop"}
Edit the core-site.xml file in /home/ogg/hadoop-3.3.0/etc/hadoop
Add the below configuration and change hostname according to your environment
Create directory hdptmpdata
mkdir -p /home/ogg/hdptmpdata
Create directory hdptmpdata
mkdir -p /home/ogg/hdptmpdata
					<configuration>
<property>
<name>fs.defaultFS</name>
<value>hdfs://hadoop-hdfs.sub10051757060.ggvcn.oraclevcn.com:9000</value>
</property>
<property>
<name>hadoop.tmp.dir</name>
<value>/home/ogg/hdptmpdata</value>
</property>
</configuration>
Edit the hdfs-site.xml file in /home/ogg/hadoop-3.3.0/etc/hadoop
Add the below configuration and change directory path accordingly.
Create directory under /home/ogg
$ mkdir -p hdfs/namenode
$ mkdir -p hdfs/datanode
Add the below configuration and change directory path accordingly.
Create directory under /home/ogg
$ mkdir -p hdfs/namenode
$ mkdir -p hdfs/datanode
					<configuration>
<property>
<name>dfs.replication</name>
<value>1</value>
</property>
<property>
<name>dfs.name.dir</name>
<value>file:///home/ogg/hdfs/namenode</value>
</property>
<property>
<name>dfs.data.dir</name>
<value>file:///home/ogg/hdfs/datanode</value>
</property>
</configuration>
Start the hadoop node and services
					[ogg@hadoop-hdfs ~]$ hdfs namenode -format

[ogg@hadoop-hdfs ~]$ start-dfs.sh
Starting namenodes on [hadoop-hdfs.sub10051757060.ggvcn.oraclevcn.com]
Starting datanodes
Starting secondary namenodes [hadoop-hdfs]

[ogg@hadoop-hdfs ~]$ jps
164084 Jps
163737 SecondaryNameNode
163340 NameNode
163485 DataNode

[ogg@hadoop-hdfs ~]$ hadoop version
Hadoop 3.3.0
Source code repository https://gitbox.apache.org/repos/asf/hadoop.git -r aa96f1871bfd858f9bac59cf2a81ec470da649af
Compiled by brahma on 2020-07-06T18:44Z
Compiled with protoc 3.7.1
From source with checksum 5dc29b802d6ccd77b262ef9d04d19c4
This command was run using /home/ogg/hadoop-3.3.0/share/hadoop/common/hadoop-common-3.3.0.jar

[ogg@hadoop-hdfs ~]$ hdfs version
Hadoop 3.3.0
Source code repository https://gitbox.apache.org/repos/asf/hadoop.git -r aa96f1871bfd858f9bac59cf2a81ec470da649af
Compiled by brahma on 2020-07-06T18:44Z
Compiled with protoc 3.7.1
From source with checksum 5dc29b802d6ccd77b262ef9d04d19c4
This command was run using /home/ogg/hadoop-3.3.0/share/hadoop/common/hadoop-common-3.3.0.jar
Create HDFS directories using HDFS CLI
					[ogg@hadoop-hdfs ~]$ hdfs dfs -mkdir /test1
[ogg@hadoop-hdfs ~]$ hdfs dfs -mkdir /test2
[ogg@hadoop-hdfs ~]$ hdfs dfs -ls /
Found 2 items
drwxr-xr-x   - ogg supergroup          0 2023-06-12 03:04 /test1
drwxr-xr-x   - ogg supergroup          0 2023-06-12 03:04 /test2
Add port 9000 to firewall or disable the Linux Firewall
					[opc@hadoop-hdfs bin]$ sudo firewall-cmd --permanent --add-port=9000/tcp
success
[opc@hadoop-hdfs bin]$ sudo firewall-cmd --reload
success
[opc@hadoop-hdfs bin]$ sudo firewall-cmd --list-ports
9000/tcp

[opc@hadoop-hdfs bin]$ sudo service firewalld stop
Redirecting to /bin/systemctl stop firewalld.service
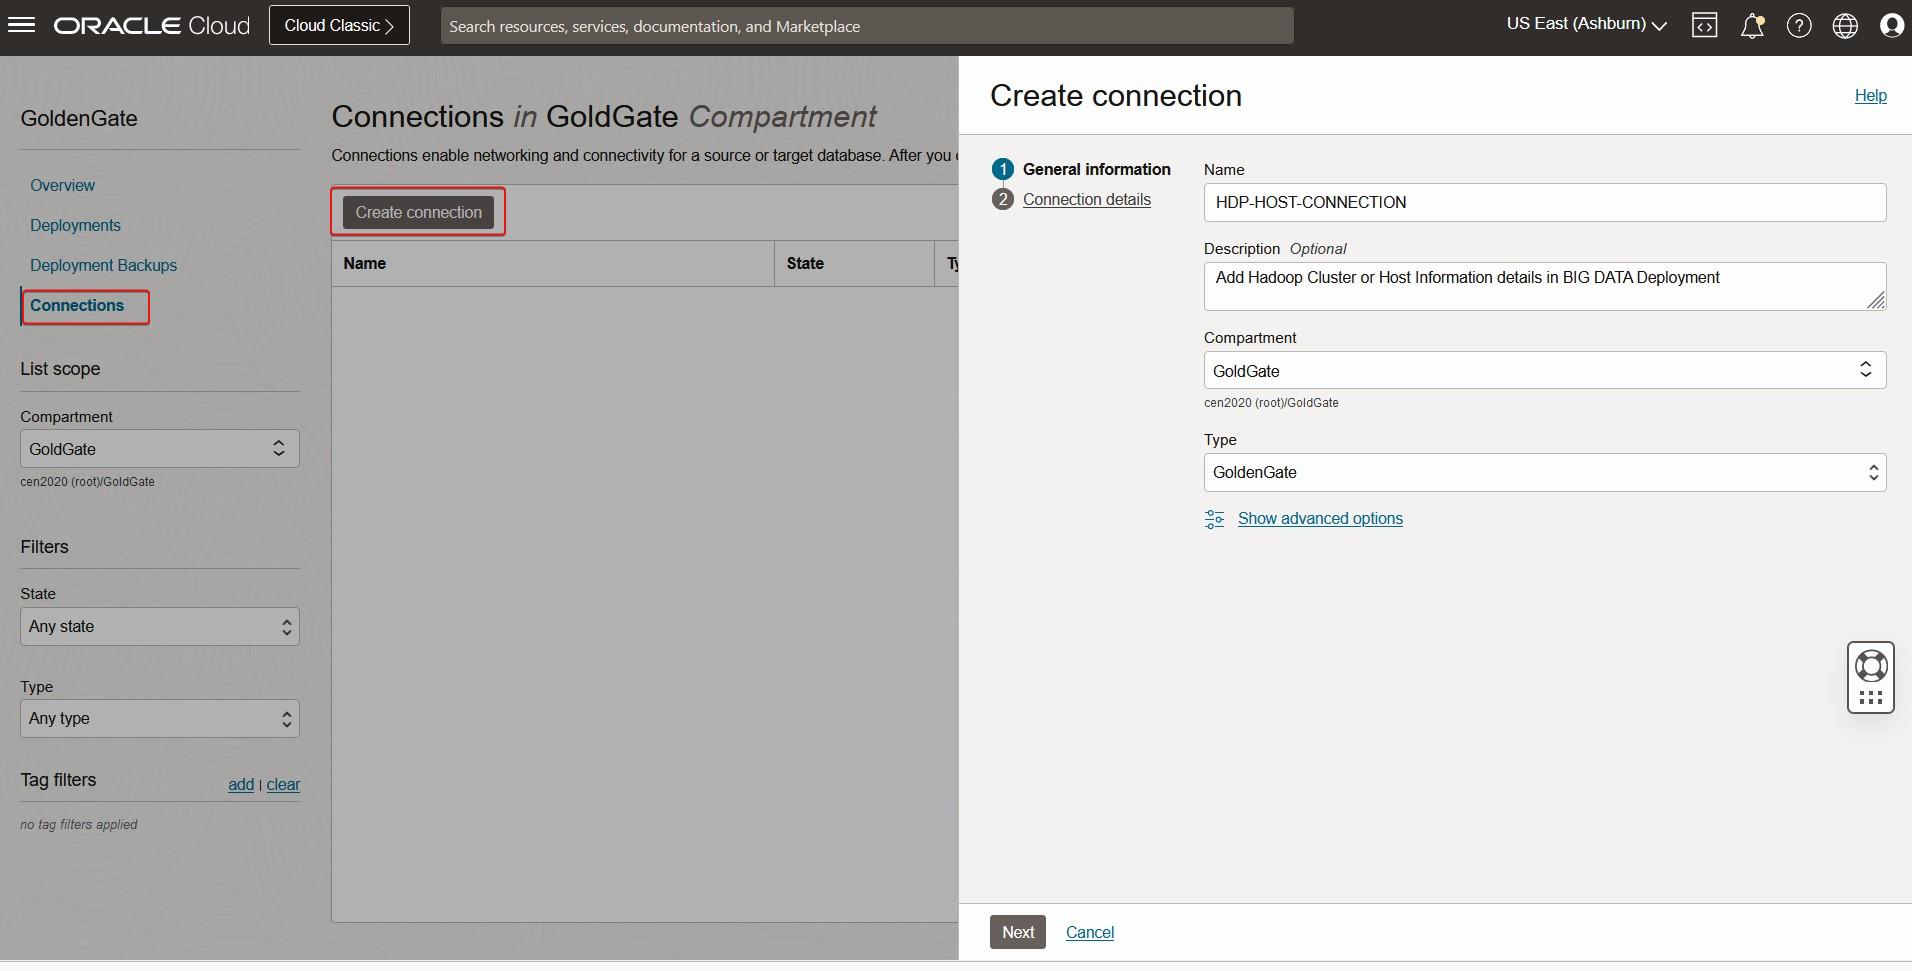
Create OCI GoldenGate Connection
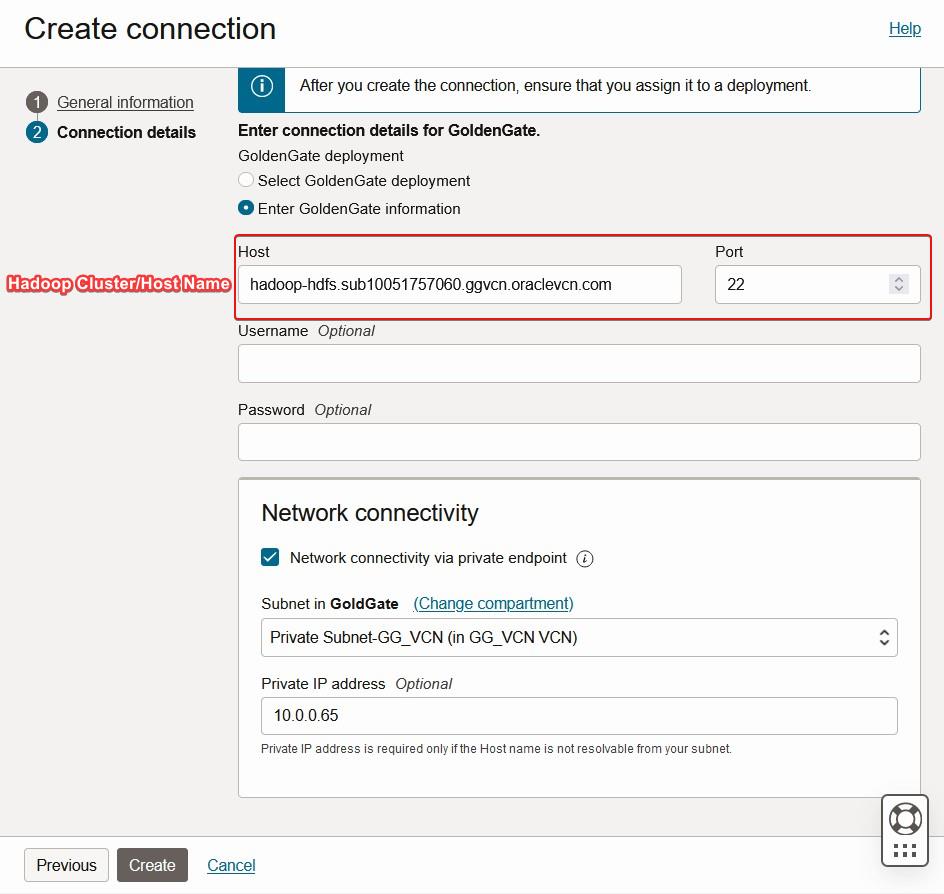
Create HADOOP HOST GoldenGate Conneciton
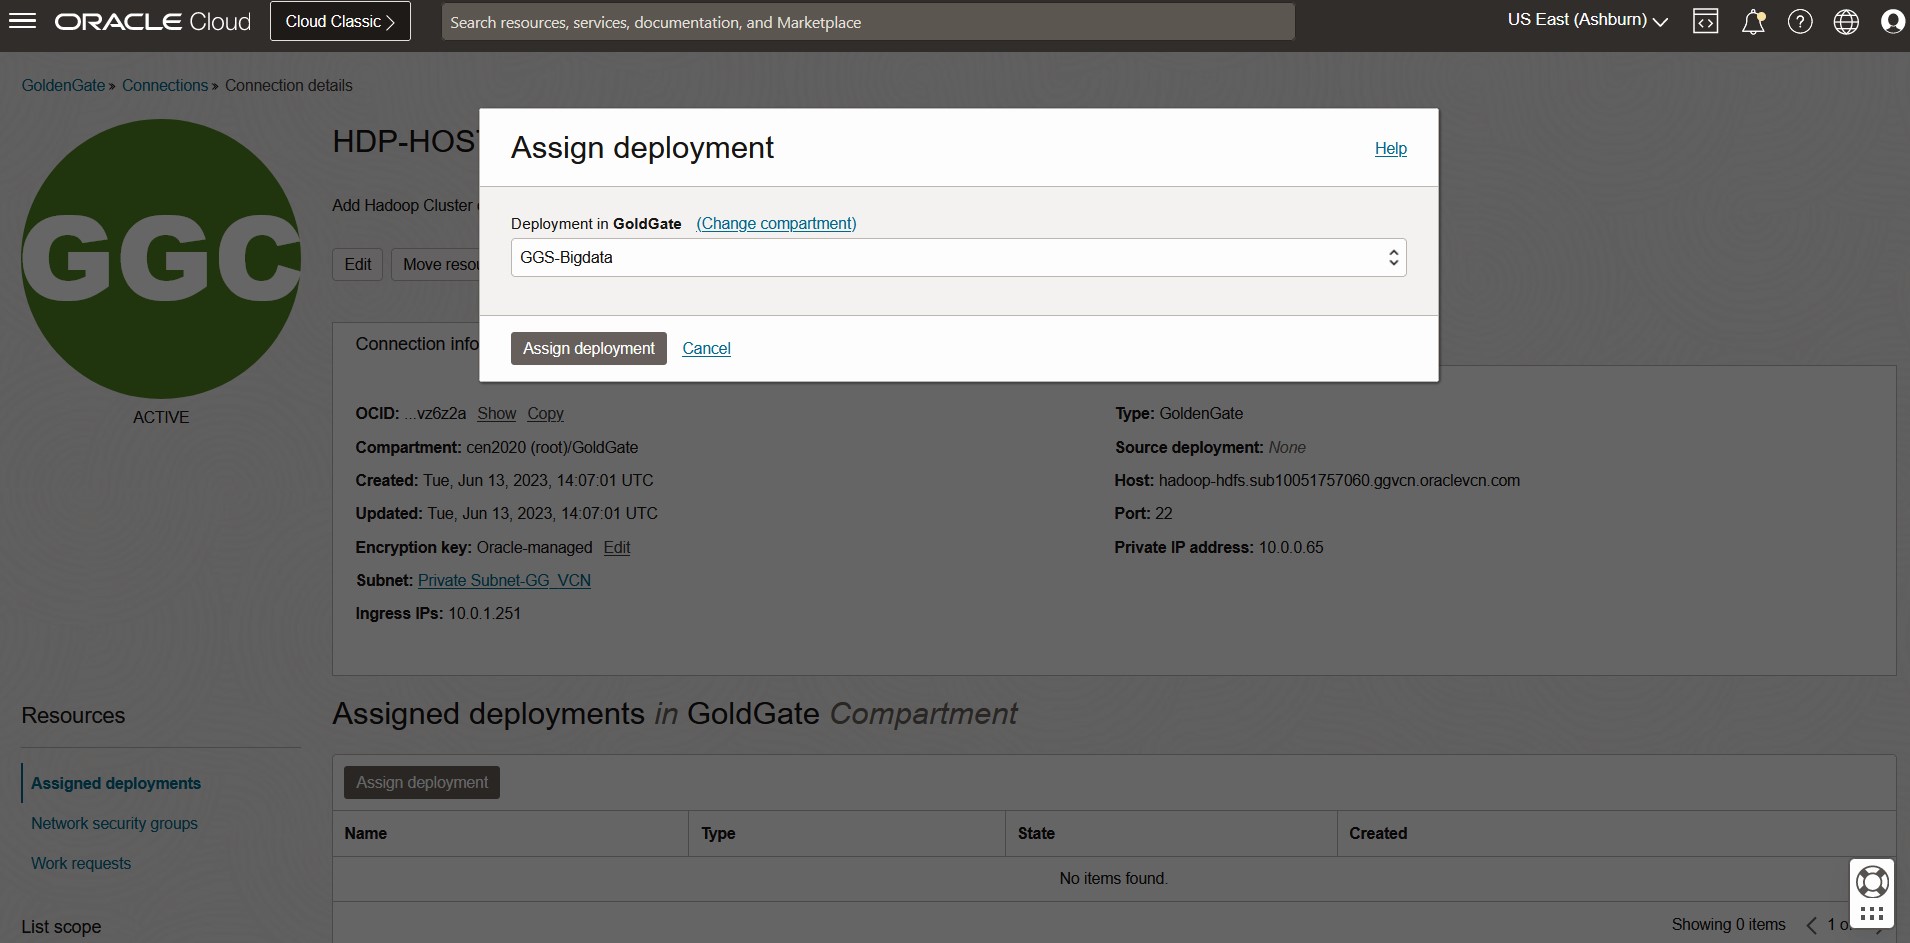
Assign the newly created Hadoop Host connection to BIGDATA Deployment.
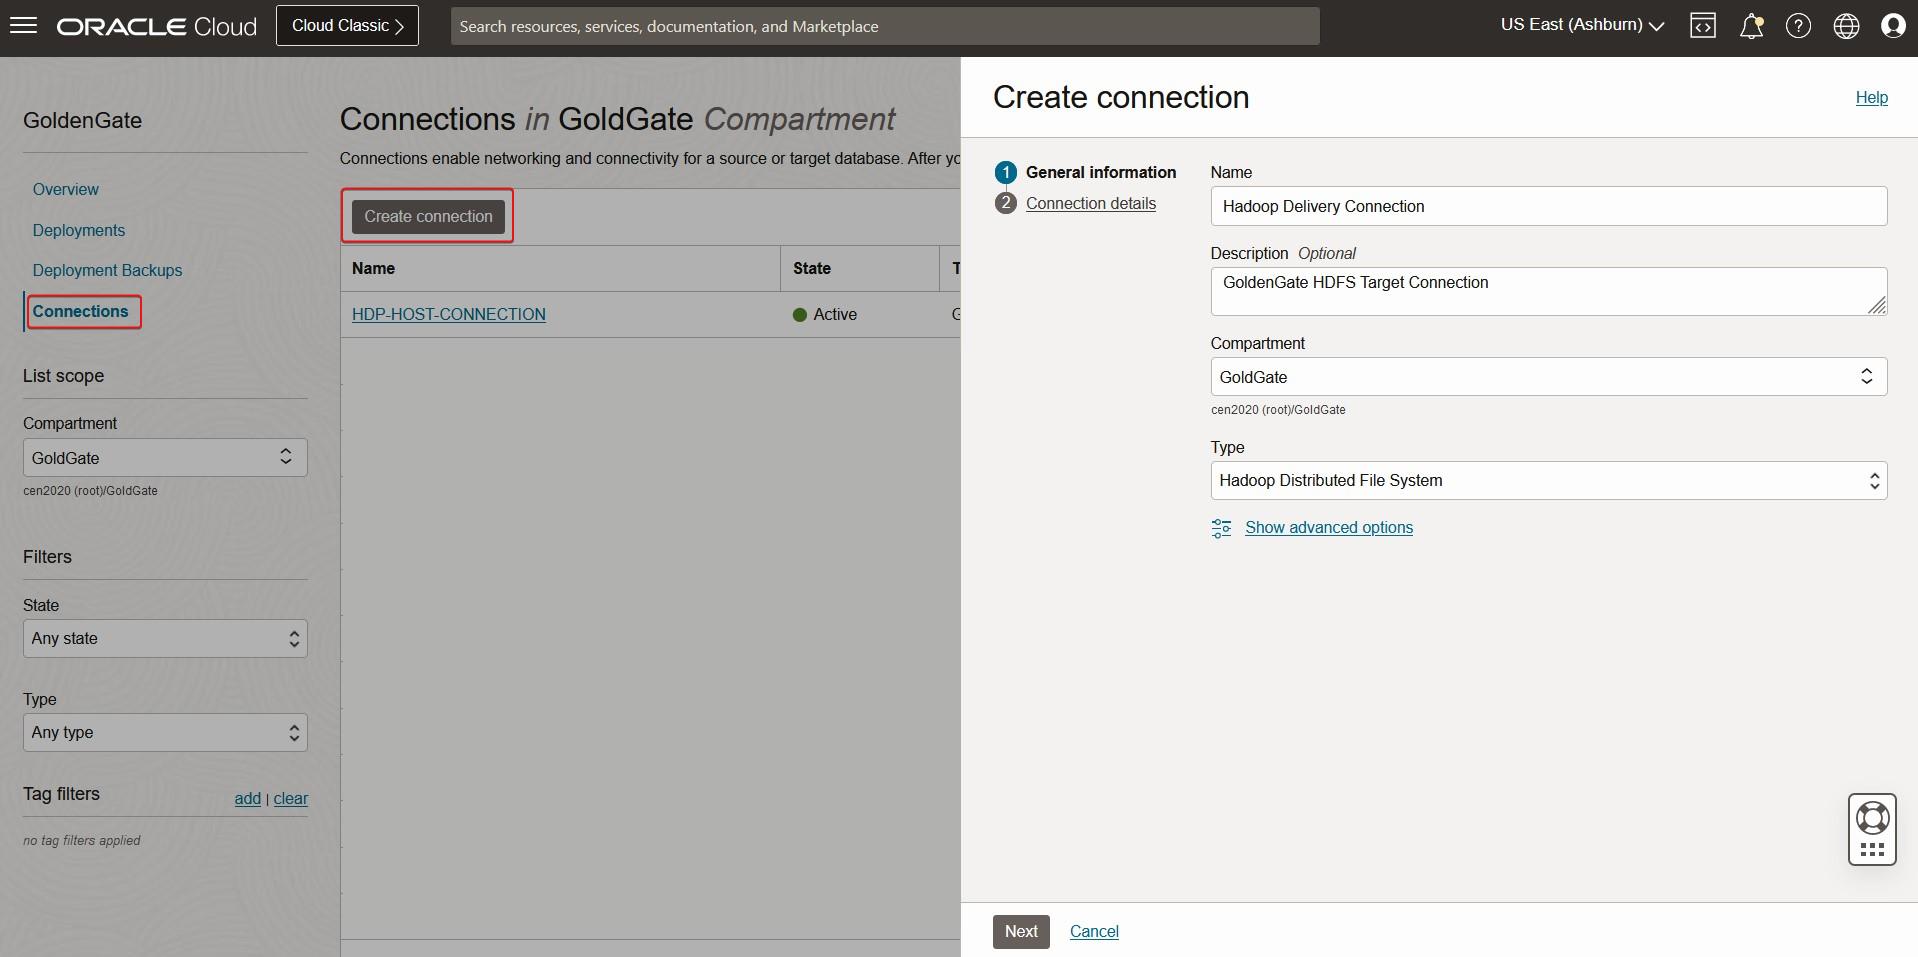
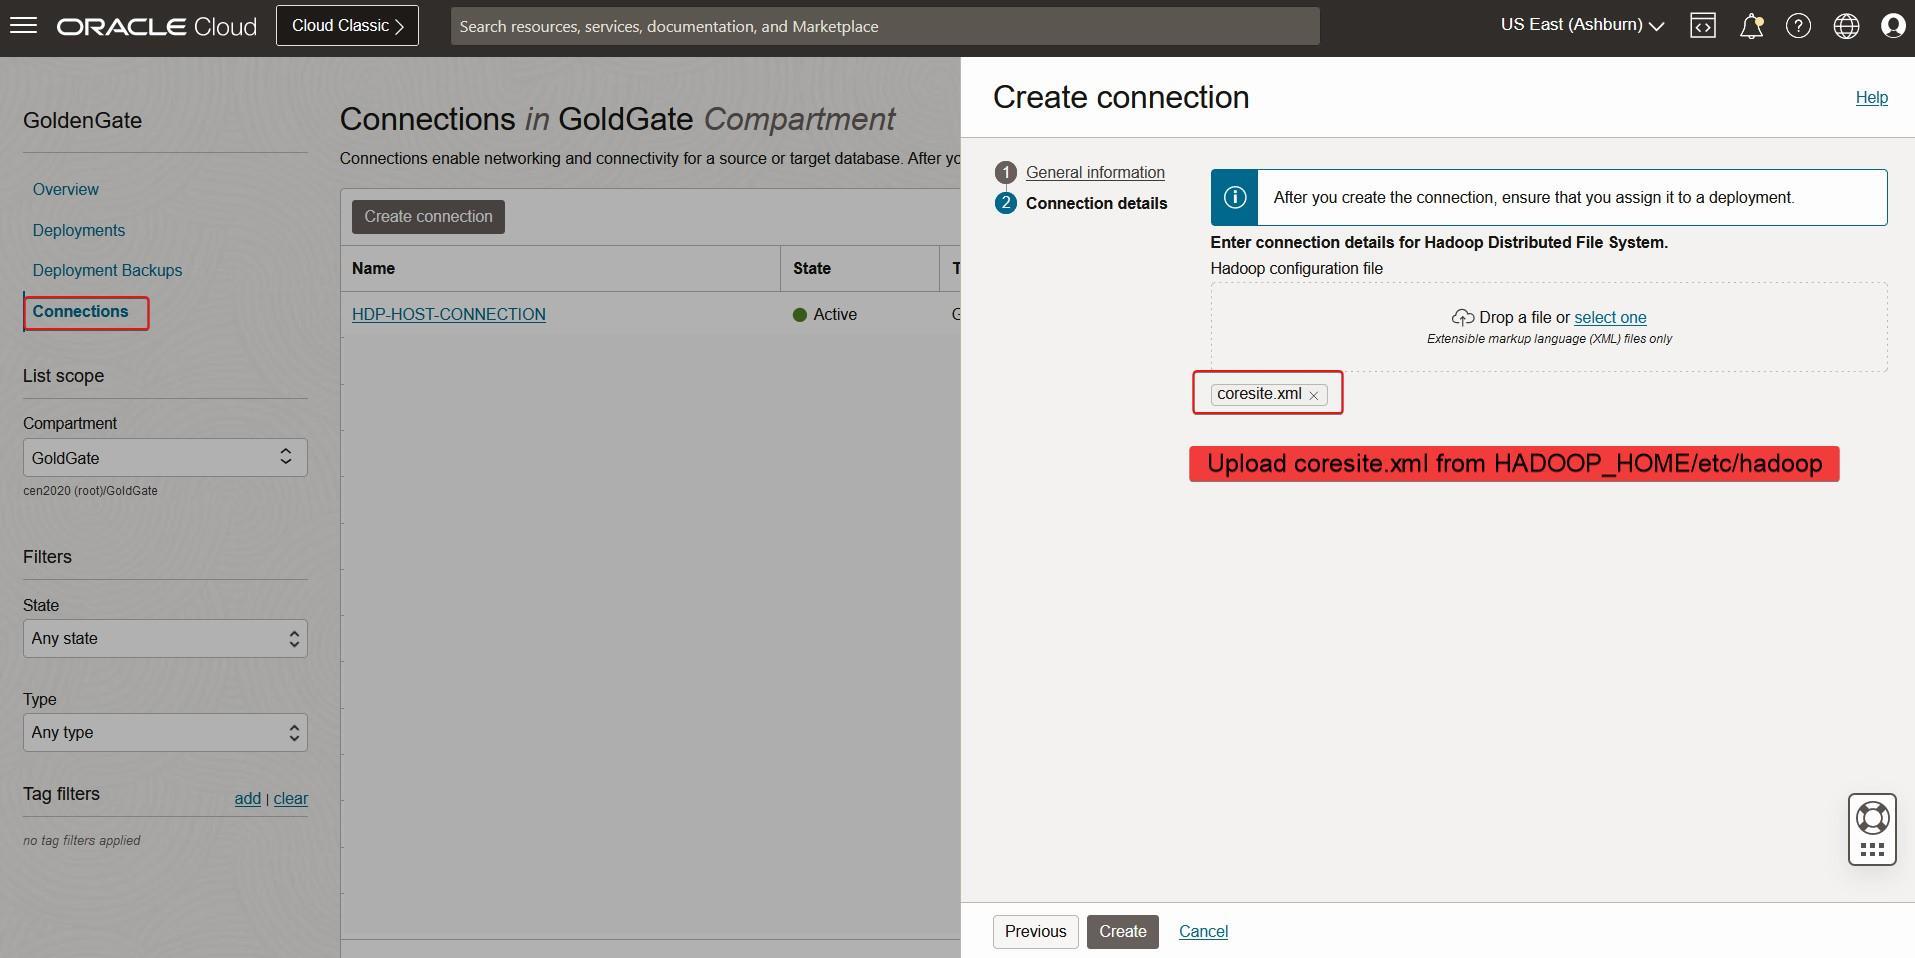
Create GoldenGate HDFS Target connection
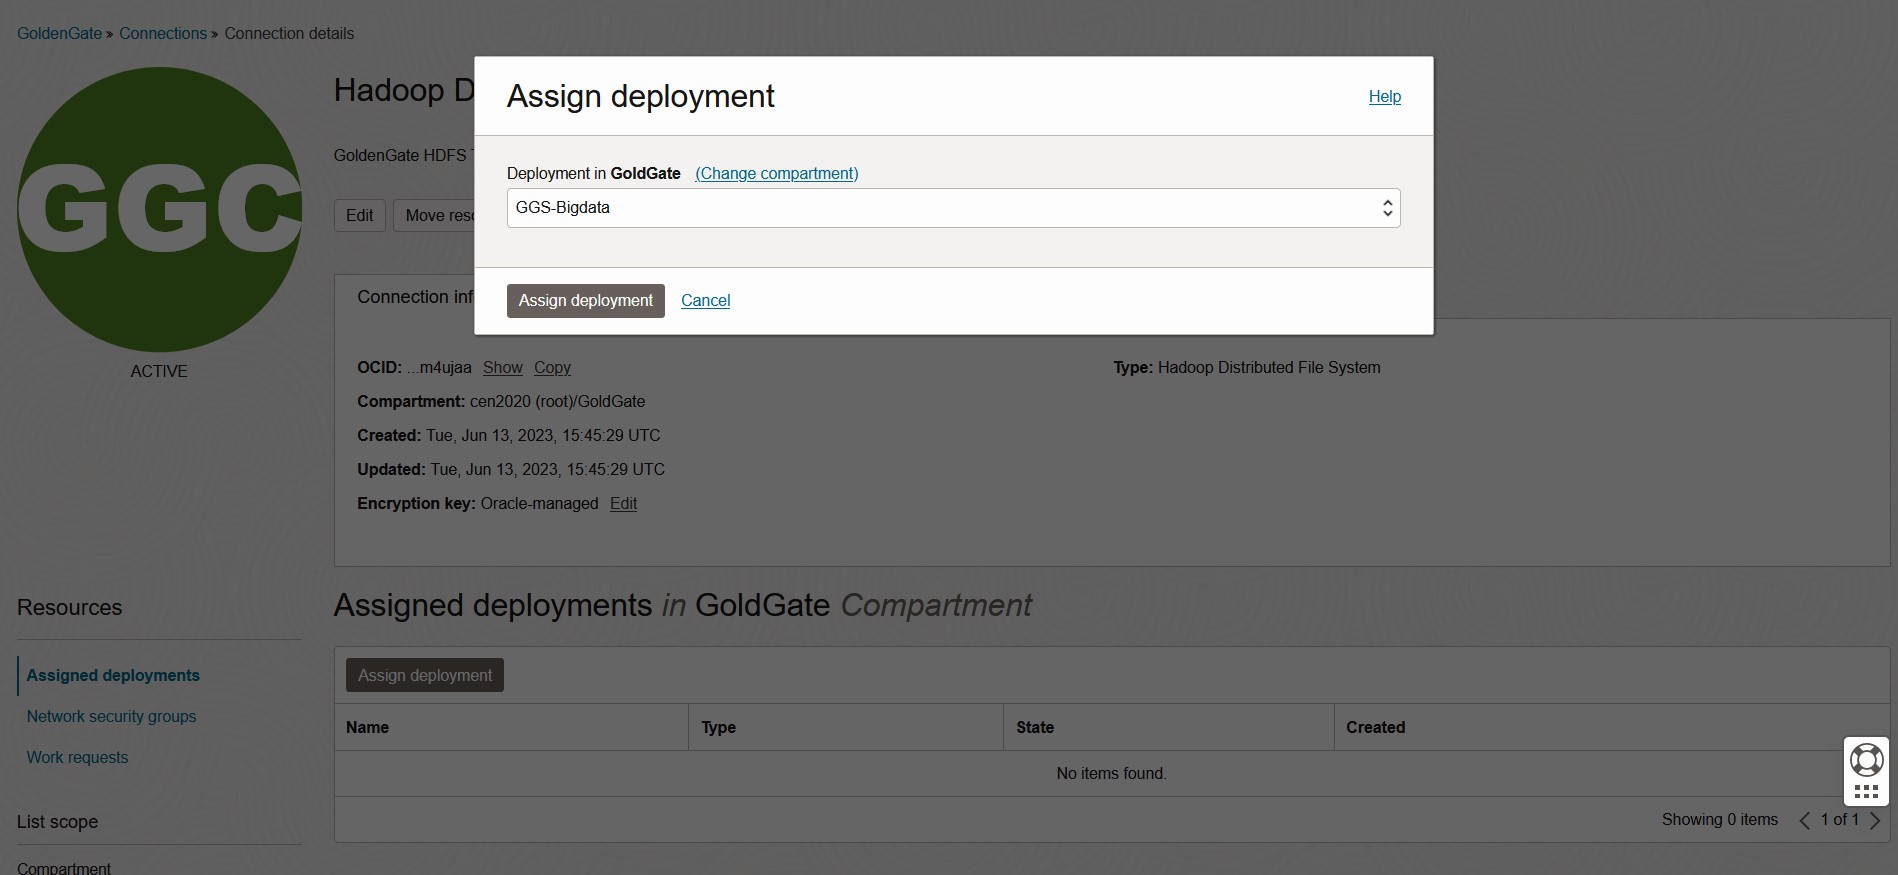
Assign the newly created HDFS Target connection to BIGDATA Deployment.
Two connections
- Hadoop Cluster / Host Information GoldenGate Connection.
- HDFS Target Connection for BigData

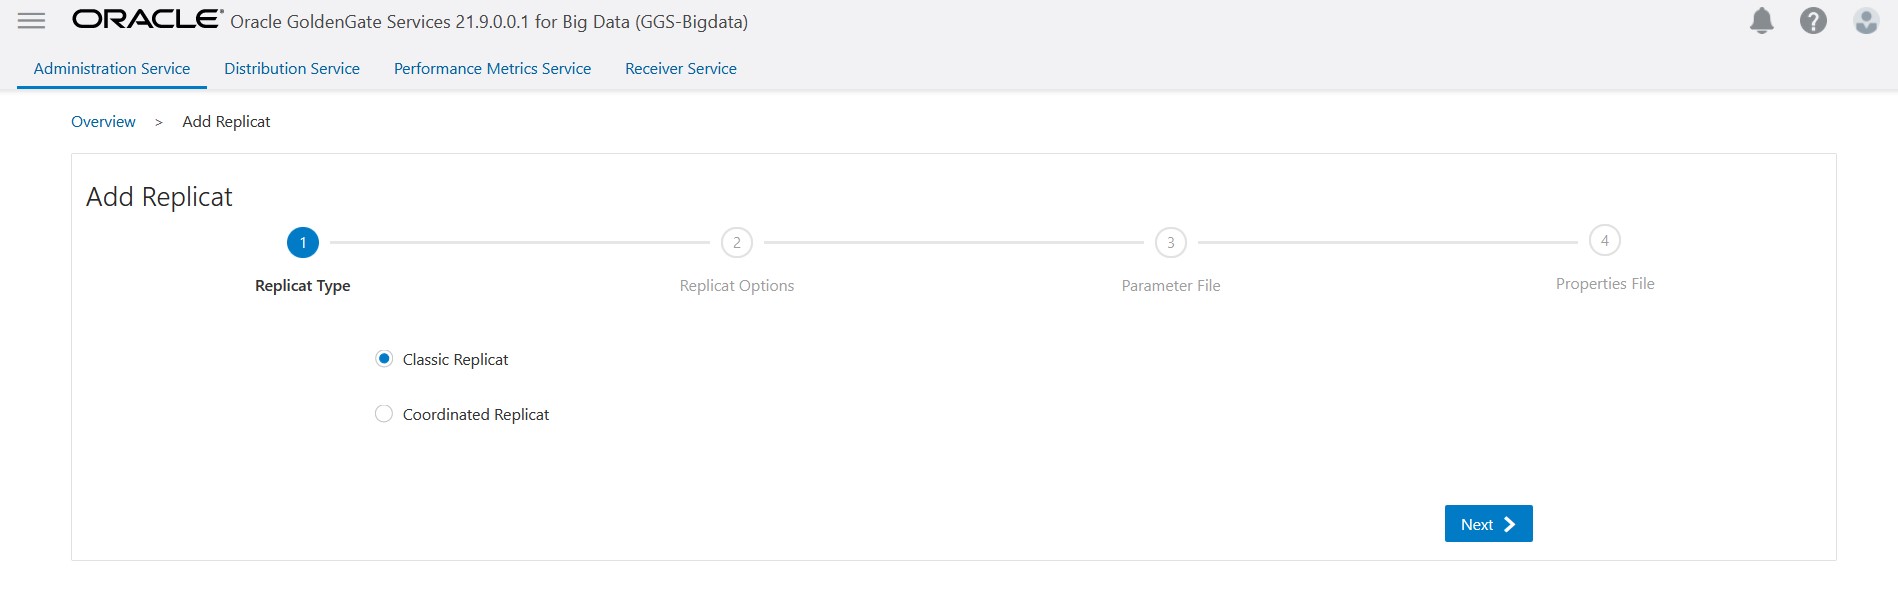
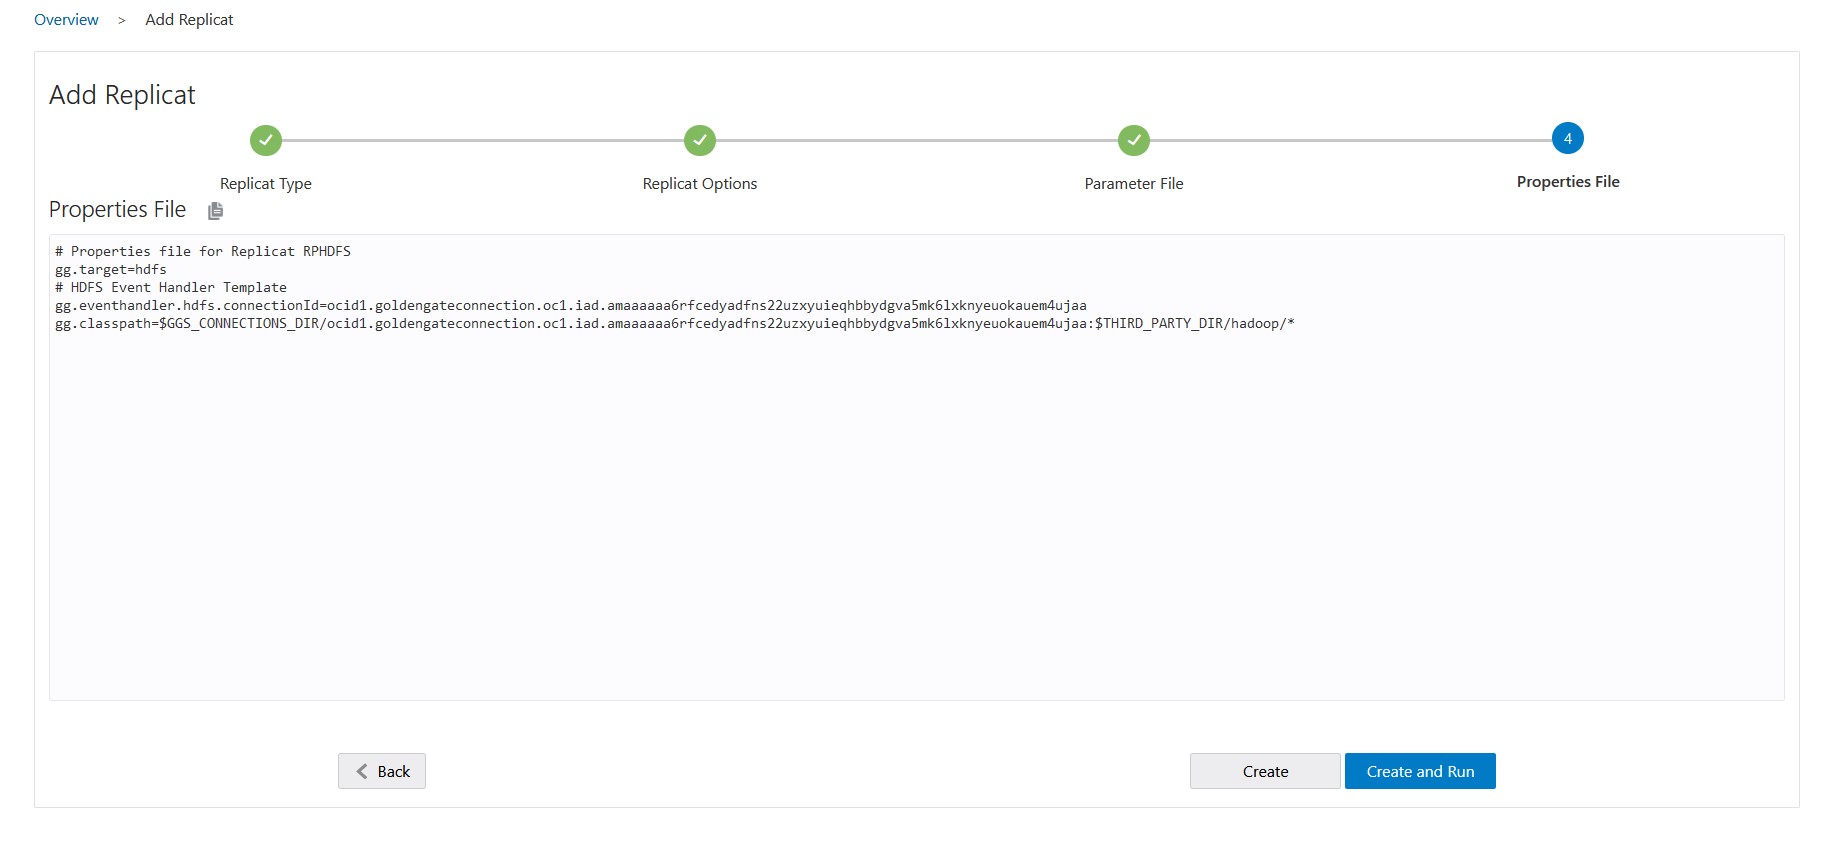
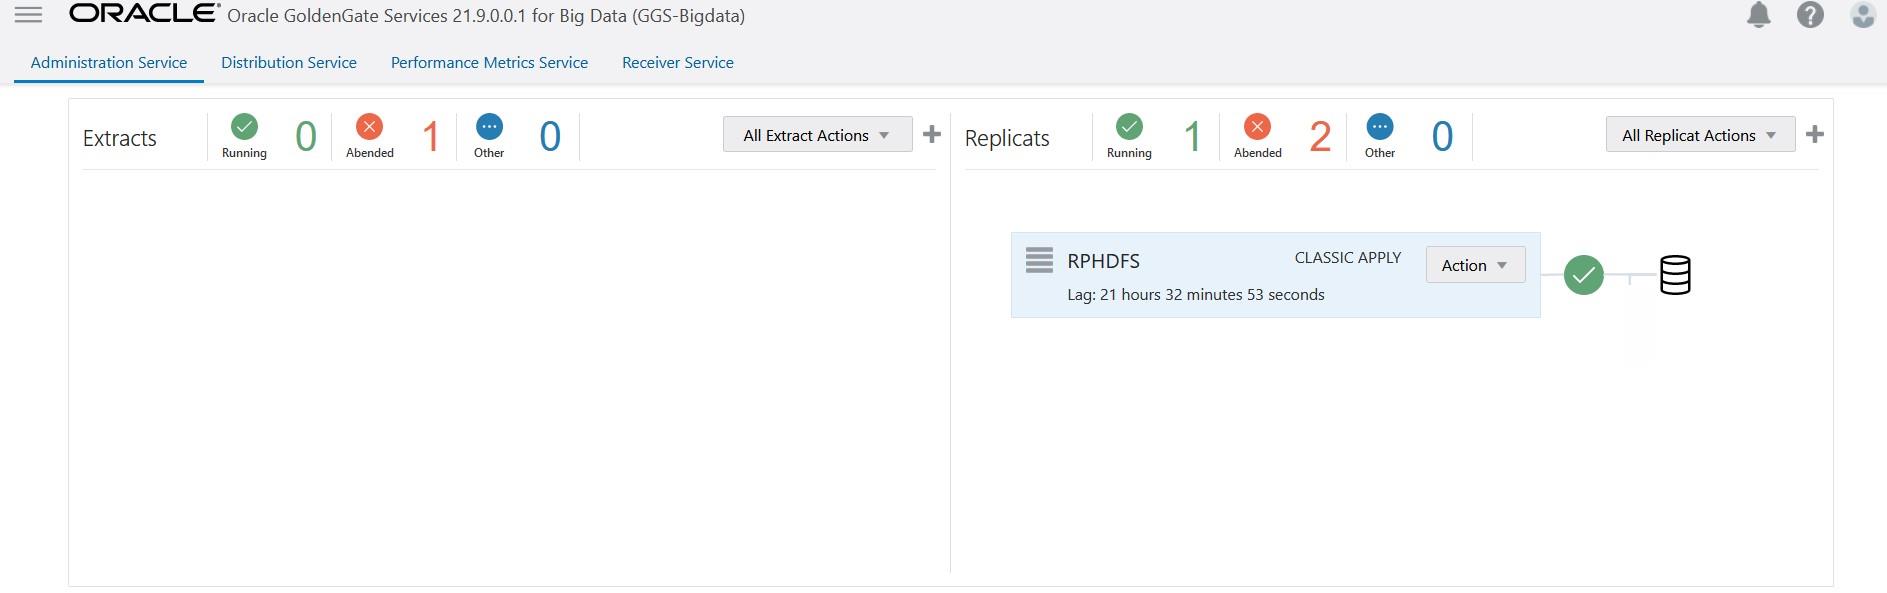
CREATE HDFS BIGDATA REPLICAT
Now let us create the Replicat to deliver the data into Hadoop HDFS
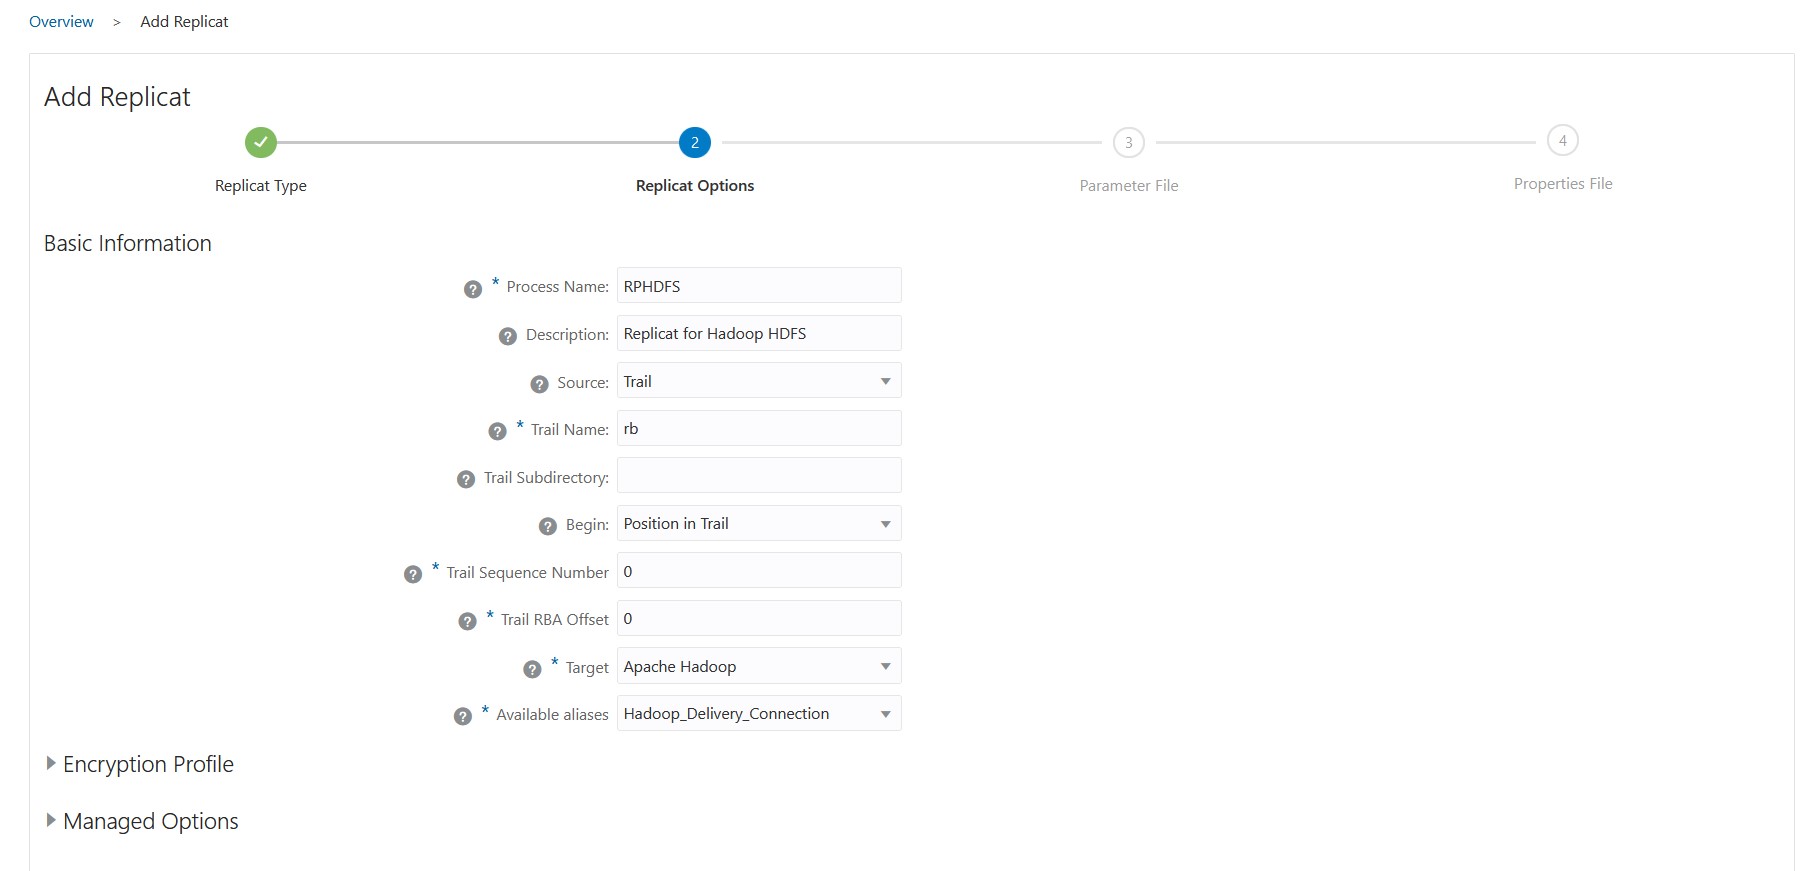
Add the Source and Target specifications.
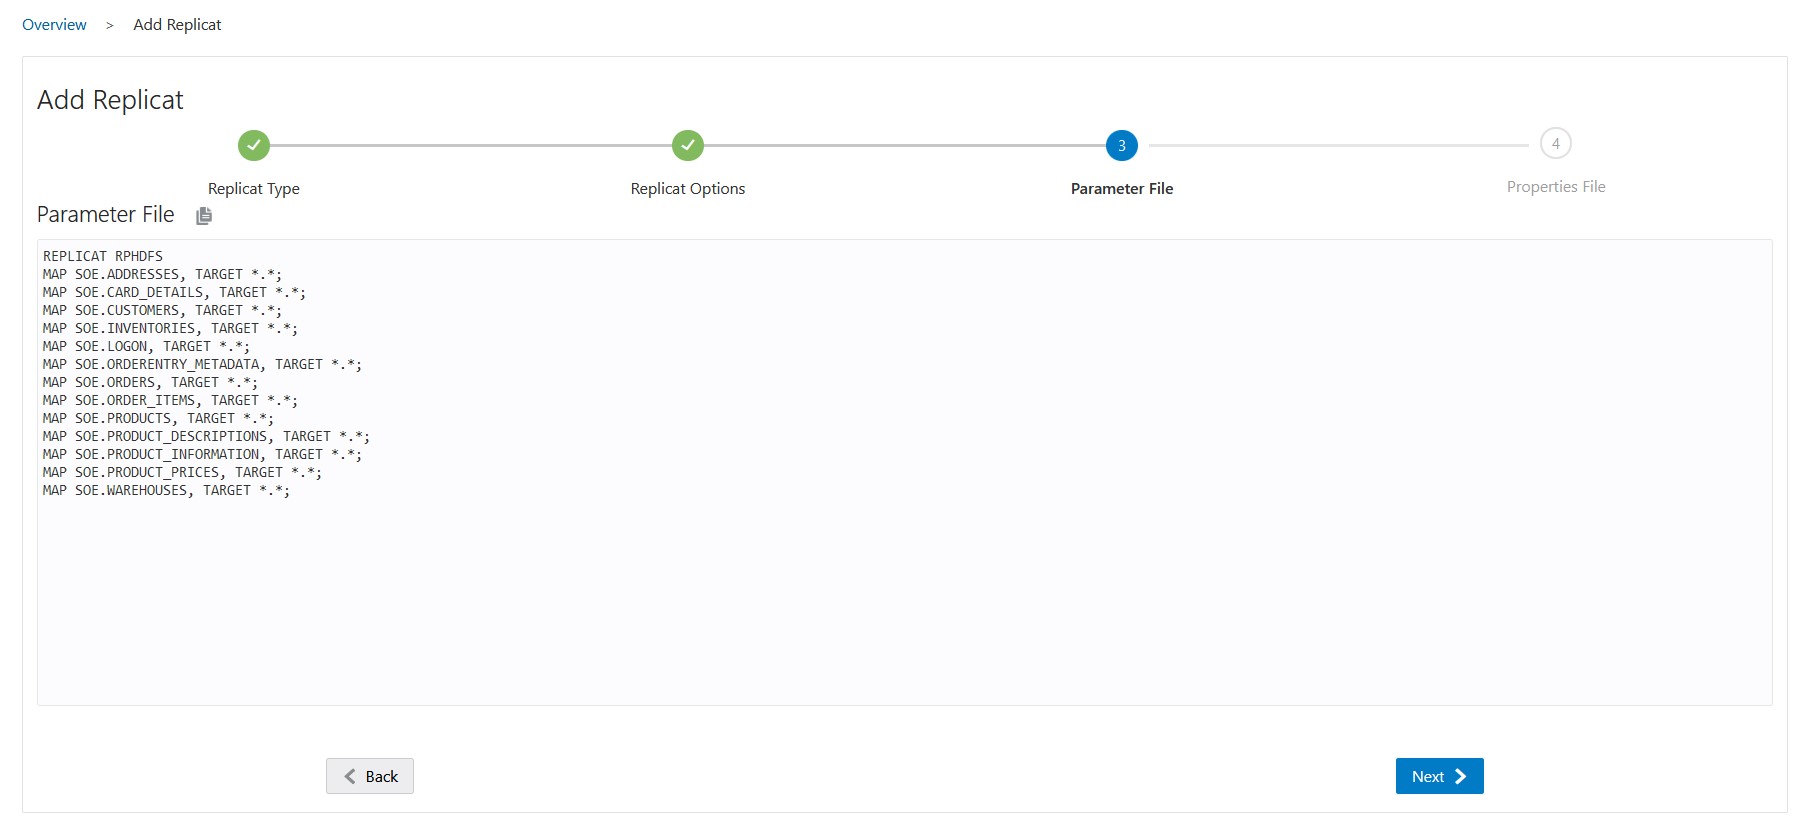
Please keep the properties files with their default connection information intact, as they were initially created.
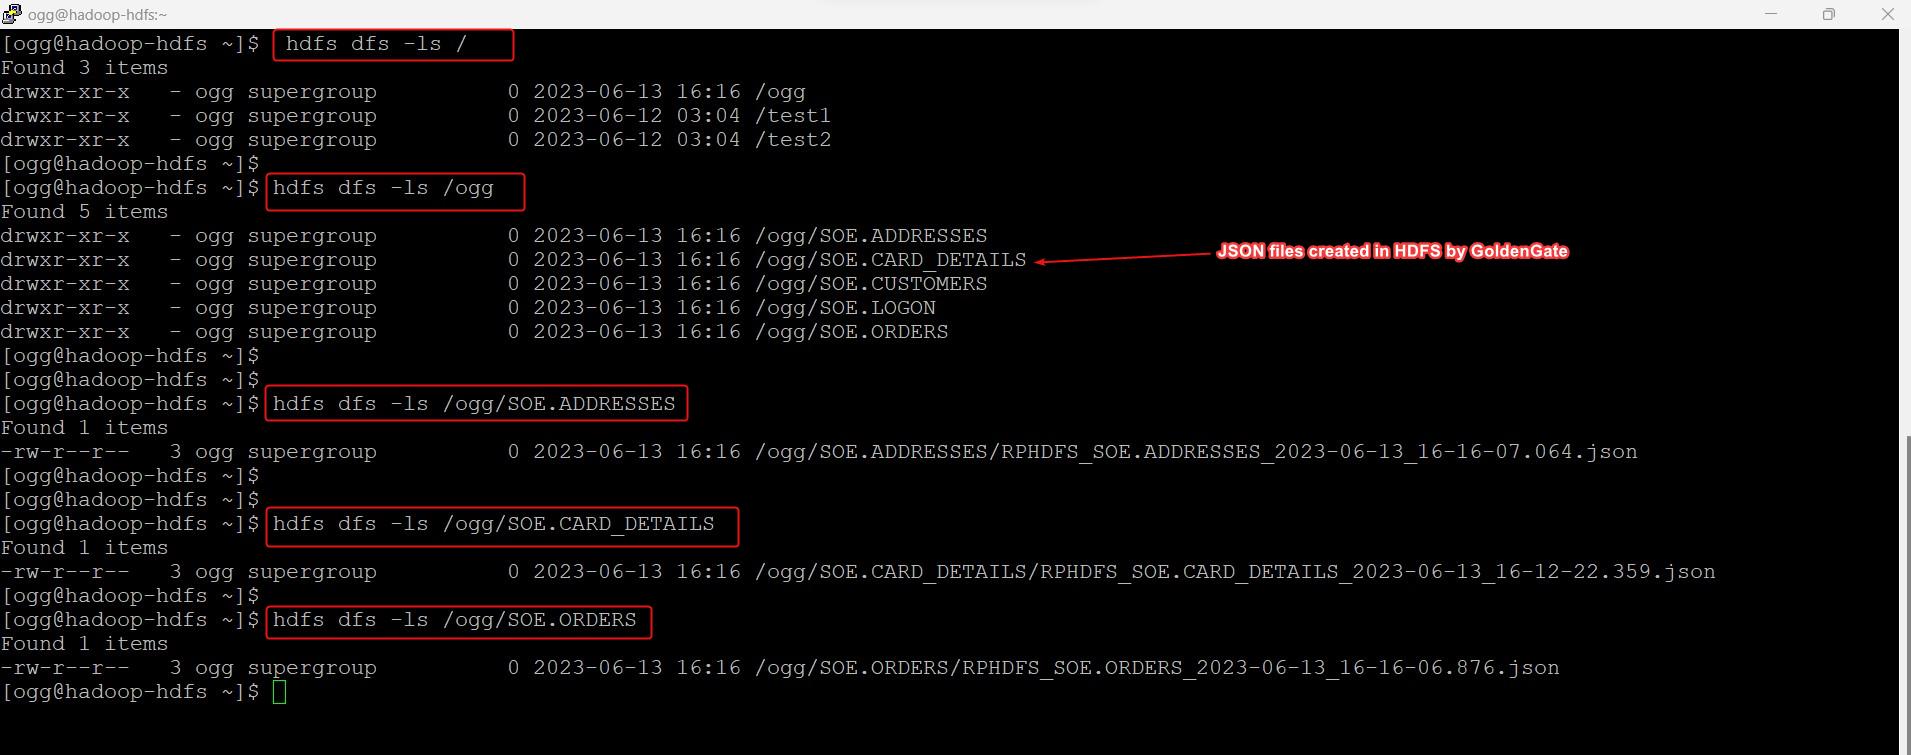
Now, let’s examine the output in Hadoop HDFS to verify if all the JSON files have been generated.
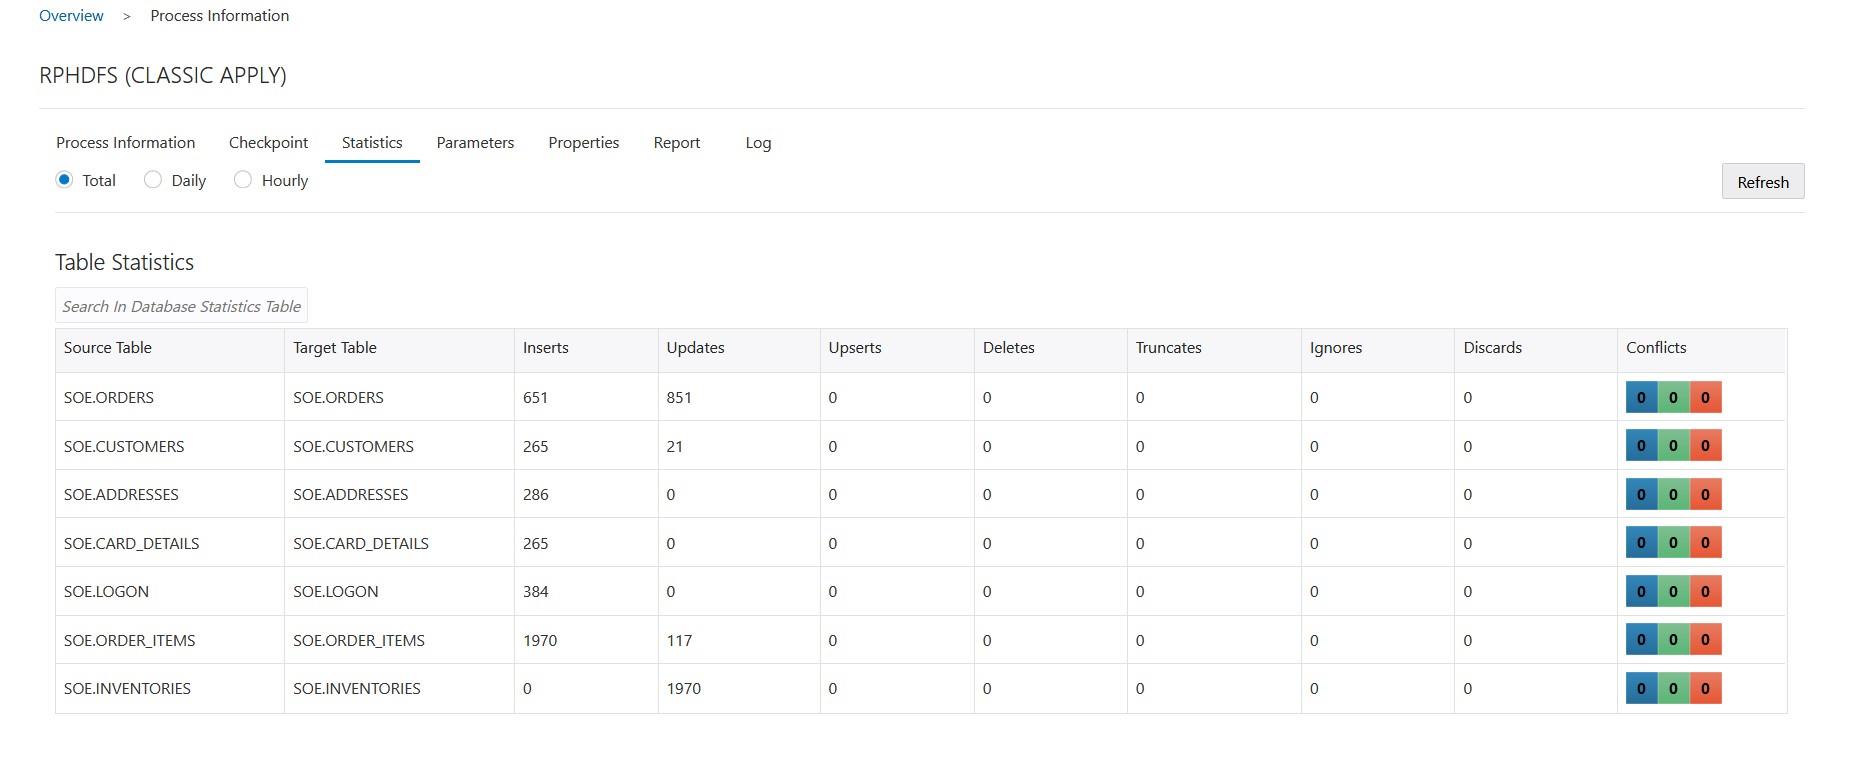
SUMMARY:In this article, we demonstrated on how to replicat the data using OCI GoldenGate Service To Hadoop HDFS BIGDATA Deployment.
For more information about GoldenGate Service BIGDATA HDFS Information please see the oracle official documentation here.
Hope you found this article useful.
Disclaimer: The views expressed on this document are my own and do not necessarily reflect the views of Oracle.
For more information about GoldenGate Service BIGDATA HDFS Information please see the oracle official documentation here.
Hope you found this article useful.
Disclaimer: The views expressed on this document are my own and do not necessarily reflect the views of Oracle.